


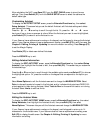
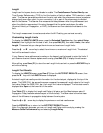

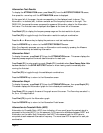
Customizing Attenuation Limits
To display the ATTENUATION LIMITS screen, press the Extended Functions key, then select
Setup Autotest, then highlight the Autotest to edit, then press Edit (F2), then press Limits (F4),
then select Attenuation. This screen displays the Attenuation frequency range and the criteria used
to determine the range.
Press the
Ò or Ñ arrow key to highlight the field to change.
If your Scanner has an alphanumeric overlay on the keypad, use the keypad to enter the limit. If
your Scanner does not have an alphanumeric overlay, press Edit (F2) to display the edit screen.
If the Criteria in the ATTENUATION LIMITS screen is set to Fixed Points, you can press Limits
(F4) to display the ATTENUATION LIMITS AND FREQUENCY screen.
After editing, press Save (F1) to store the new limits and exit or press the ESCAPE key to exit
without saving.
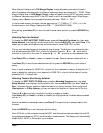
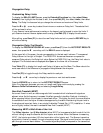
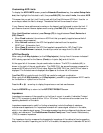
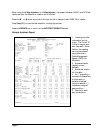
Attenuation Limits and Frequency
If the Criteria in the ATTENUATION LIMITS screen is set to Fixed Points, you can display the
ATTENUATION LIMITS AND FREQUENCY screen. To display this screen, press the Extended
Functions key, then select Setup Autotest, then highlight the Autotest to edit, then press Edit
(F2), then select Limits, then select Attenuation, then press Limits (F4). This screen displays
Attenuation limits for each frequency and lets you specify the frequencies to be included in the
Autotest.
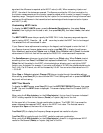
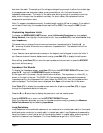
Press the
Ñ or Ò arrow key to highlight the Attenuation frequency to be included in the
Autotest.
Press Select (F2) (or Unsel) to include (or skip) the Attenuation frequency during the Autotest.
Press Edit (F3) to change the Attenuation limit for the highlighted frequency.
After editing, press Save (F1) to store the new limits and exit or press the ESCAPE key to exit
without saving.
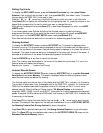
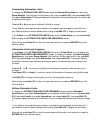
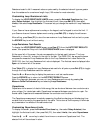
Editing Attenuation Limits
To display the ATTENUATION LIMITS FOR FREQUENCY screen, press the Extended
Functions key, then select Setup Autotest, then highlight the Autotest to edit, then press Edit
(F2), then select Limits, then select Attenuation, then press Limits (F4), then press Edit (F3).
This screen displays the maximum Attenuation limit for the selected frequency and lets you change
it.
If your Scanner has an alphanumeric overlay on the keypad, use the keypad to enter the limit. If
your Scanner does not have an alphanumeric overlay, press Edit (F2) to display the edit screen.
After editing, press Save (F1) to store the new maximum Attenuation limit and exit or press the
ESCAPE key to exit without saving.