


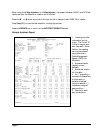

Page 35
4. Begin the transfer from the Scanner (see step 7 in Printing or Downloading Test
Results, above). Select “text” as the Print Format. You should see the information
scrolling on the Procomm Plus window while the transfer is in progress.
5. When the transfer is complete, press ALT + F1 again to close the log file. The file will
be saved under the current directory.
6. Press ALT + X to exit the Procomm Plus package.
You can now use the DOS ‘COPY’ command to print the log file to a printer; i.e., “COPY
filename.txt LPT1”.
Procomm Plus for Windows
To send reports to a PC using Procomm Plus for Windows, open Procomm Plus and perform these
steps:
1. Press ALT + S to select terminal options. Ensure that the handshake method selected is
SOFTWARE, set the port to be used (COM1 or COM2). Set the data bits (8), stop
bits (1) and parity (None), and set the baud rate to the highest speed that your system
will support. Set the terminal setting to VT100. Set the protocol to ASCII. Save the
new settings.
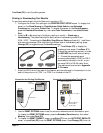
2. On the Scanner, press the Extended Functions key, then select Printer Port. Set the
baud rate to match the baud rate set in Procomm Plus and set the handshake to
XON/XOFF.
3. Select the download folder. Type the desired file name. Give the filename a “.TXT”
extension to make it easy to locate.
4. Begin the transfer from the Scanner (see step 7 in Printing or Downloading Test
Results, above). Select “text” as the Print Format. You should see the information
scrolling on the Procomm Plus window while the transfer is in progress.
5. When the transfer is complete, click OK.
6. Exit Procomm Plus.
You can now use the DOS ‘COPY’ command to print the report file to a printer; i.e., “COPY
filename.txt LPT1”.
Uploading NEXT and Attenuation Graphs to a PC with Procomm Plus
Procomm Plus for DOS
1. Open the Procomm Plus application.
2. Press ALT + P to enter port parameters. Set the port to be used (COM1 or COM2),
the baud rate (default is 9600), the data bits (8), stop bits (1) and parity (None). Press
Alt + S to save settings.
3. On the Scanner, press the Extended Functions key, then select Printer Port. Set the
baud rate to match the baud rate set in Procomm Plus and set the handshake to
RTS/CTS. Press F3 (Printer) to display and change the Graphics Printer options. Save
these changes.
4. In Procomm Plus, press Alt + S to get to the Procomm Plus setup utility.
5. On the Procomm Plus setup utility menu select FILE/PATH OPTIONS. On the
FILE/PATH OPTIONS menu select C- Default path for downloaded files
(PgDn) x:directory path. Make sure the path specified is the one to which you would
like to save the files.
6. Press ESC to return to the Procomm Plus Setup Utility menu. Select TERMINAL
OPTIONS. On the TERMINAL OPTIONS menu, set C-Soft flow ctrl (XON/XOFF) to