


Chapter 1 Installing and Configuring the SCXI-1127/1128
© National Instruments Corporation 1-21 SCXI-1127/1128 User Manual
– SH9MD-9MD cable
– 8-position HVAB plug
– HV8-BAN4 cable
• External DMM (if needed)
• BAN2-WIRE kit (two kits needed for 4-wire), if not using the
HV8-BAN4 cable
• Cable or wires to connect the handshaking lines to the
SCXI-1127/1128
• 1/8 in. flathead screwdriver
Consult the documentation for your SCXI chassis and other SCXI modules
for additional instructions and warnings. You should have installed your
SCXI-1127/1128 modules according to the instructions given in Installing
the SCXI-1127/1128 Module into the SCXI Chassis section. Any other
SCXI modules should already be installed according to their installation
instructions. To install the SCXI-1127/1128 module with an SCXI chassis,
follow these steps:
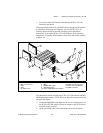
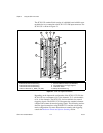
1. Install the SCXI-1127/1128s in the chassis and install the HVAB as
described in one of the Connecting the SCXI-1127/1128 Backplane
sections.
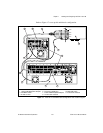
2. To connect an SCXI-1127/1128 to an external DMM device, you need
two cables—the HV8-BAN4 or BAN2-WIRE cable, and a cable to
connect the handshaking lines from the SCXI-1127/1128 to the DMM.
Attach your HV8-BAN4 cable to the HVAB connector on the
HVAB-backplane adapter or connect your BAN2-WIRE cable to the
OUT0 terminals on the SCXI-1331 terminal block. When making
four-wire measurements you must also connect a BAN2-WIRE cable
to the OUT2 terminals.
3. Attach the other end of the HV8-BAN4 or BAN2-WIRE cable to the
inputs of your external DMM device.
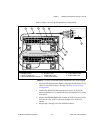
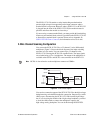
4. Connect the handshaking lines from the front of the SCXI-1331
terminal block to the appropriate lines on the external DMM. See
Chapter 2, Handshaking Scanning, for information on how to use the
SCXI-1127/1128 handshaking lines.
5. Check the installation.
6. Turn on the SCXI chassis.
7. Turn on the computer or reconnect it to your chassis.
The SCXI-1127/1128 module is now installed.