8-25
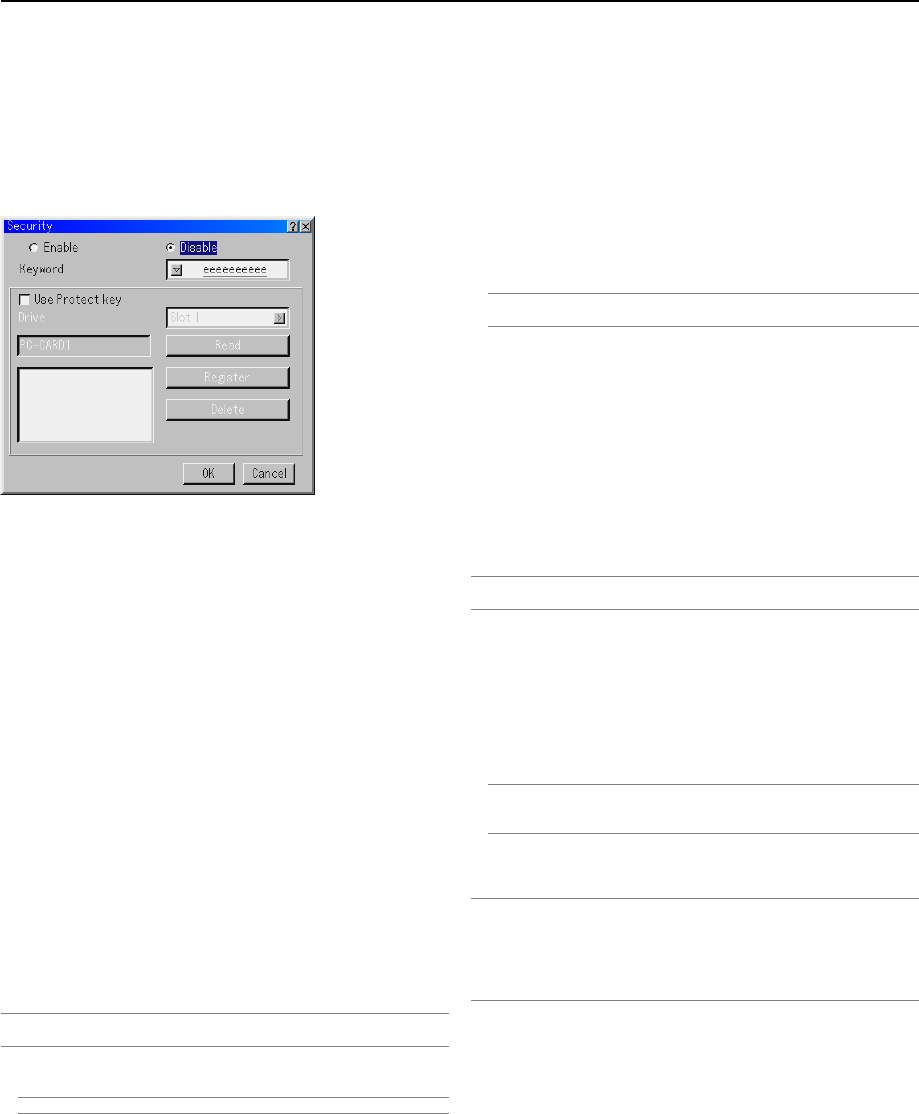
Enable/Disable ........ This turns the Security function on or off.
Keyword .................. Enter an appropriate keyword when you
use the Security function.
(Up to 10 characters can be used.)
The Security function is available only
when your keyword is entered.
Use Protect key ....... Check this box to lock your projector
when using a PC card. To use a key-
word without a PC card, do not check
this box.
Drive ........................ Switches between PC Card slots.
Read........................ Reads data of a PC card.
Register ................... Registers data of the PC card.
The Security function is not available un-
less at least one PC card is registered.
(if the “Use Protect key” check box is se-
lected)
Up to 5 PC cards can be registered.
Delete ...................... Deletes data of a registered PC card.
To set up a keyword to enable the Security function without
using a registered PC card.
NOTE: Only numbers can be entered when you use the remote control Source/
Input buttons.
1. Use the SELECT
̆̄
button to select “Keyword” and use the software
keyboard to enter a keyword.
NOTE: Please make a note of your keyword.
2. Use the SELECT
̆̄
button to select “Enable” and use the SELECT
̆̄
button to select “OK”, then the Security function will be enabled. An
“Are you sure?” message will appear. Use the SELECT
̇̈
button and
press the ENTER button.
The Security function takes effect.
Security
The Security function enables you to protect your projector so
that the projector will not project a signal unless you enter a key-
word. There is also an option to lock the projector by using a
registered PC card as a protect key. Once you have registered
your PC card as a protect key, you are required to insert the
registered PC card into the PC card slot of the projector each
time you turn on the projector. You can enable the Security func-
tion by using a keyword only.
To register a PC card as a protect key.
1. Insert a PC card into the PC card slot of the projector.
2. Use the SELECT
̆̄
button to select “Use Protect key” and press the
ENTER button. A check mark will be placed.
3. Use the SELECT
̆̄
button to select "Read" and press the ENTER
button.
Data of the PC card will be read into the projector.
4. Use the SELECT
̆̄
button to select "Register" and press the ENTER
button.
Downloaded data will be registered and be displayed in the list window.
5. Use the SELECT
̆̄
button to select "Keyword" and use the software
keyboard to enter a keyword.
NOTE: To use a PC card as a protect key, you must also set up a keyword. Please
make a note of your keyword.
This completes registration of your PC card.
To enable Security, use the SELECT ̆̄ button to select "En-
able" and use the SELECT ̆̄ button to select "OK" and "Secu-
rity function will be enabled. An “Are you sure?" message will
appear. Use the SELECT ̇̈ button and press the ENTER but-
ton.
The Security function takes effect.
To turn on the projector when Security is enabled (when
using your keyword only).
NOTE: Only numbers can be entered when you use the remote control Source/
Input buttons.
1. Press and hold the POWER button for a minimum of two seconds.
The projector will be turned on and display a message to the effect that
the projector is security-protected.
2. Select [Projector Options]
→
[Security] from the menu and press the
ENTER button.
The Release Code input screen will be displayed.
3. Enter your keyword in the Release Code input screen.
You can view the projected image.
NOTE: Do not forget your keyword. However, if you forget your keyword, NEC or
your dealer will provide you with your Release Code. See more information at
the end of this section.
To turn on the projector when Security is enabled (when
using a PC card as a protect key).
NOTE: The projector does not support FAT32 or NTFS formatted flash memory
card or USB memory device.
Be sure to use a flash memory card or USB memory device formatted with the
FAT16 or FAT file system.
To format your flash memory card or USB memory device in your computer, refer
to the document or help file that comes with your Windows.
1. Insert your registered PC card into the PC card slot.
2. Press and hold the POWER button for a minimum of two seconds.
The projector will turn on and then recognize the PC card. Once the
image has been projected, it will stay on without the PC card.
• The security disable mode is maintained until the main power is turned
off (by setting the main power switch to "O" or unplugging the power
cable).
In the following cases you will be asked to check the protect key or
input the keyword:
(1) When "OK" is selected at an image for which security is set and
the power is turned off then back on
(2) When the main power is turned off then back on while the security
function is enabled
8. Using On-Screen Menu


