


Chapter 3
Configuration via Local Pages
E-DOC-CTC-20051017-0169 v0.1
51
3.2 VPN Client
VPN context For a VPN client-server scenario a dedicated set of user-friendly configuration pages
is available. Separate pages exist for the client and server sides. In this section the
VPN client configuration page is described.
The VPN client in the SpeedTouch™ can replace a software VPN client installed on a
computer. You can use it for example to connect from your home to your
employer’s corporate network for teleworking. The VPN Client page allows you to
configure a VPN client that functions in Initiator mode. This means that the VPN
client takes the initiative to set up a secure connection to a remote VPN server.
Advantages of the
SpeedTouch™ VPN
Client
Using the VPN client in the SpeedTouch™ has several advantages over the use of
VPN client software installed on the computer of the end user.
The administrator of the corporate network does not have to worry about
upgrades of the Operating System on the teleworker’s computer (Microsoft
Windows upgrades, new service packs,...). The operation of the VPN client in
the SpeedTouch™ is not affected by these upgrades because it is OS
independent.
Since the VPN client is fully integrated in the SpeedTouch™, it can not be
tampered with, and is probably more secure than software residing on a
computer.
Adverse interactions with computer software, such as firewalls, PPPoE clients,
wireless drivers, viruses and worms are avoided. This guarantees a better
stability and fewer functionality problems.
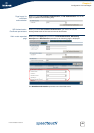
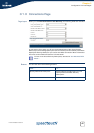
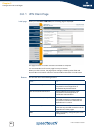
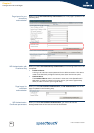
Selecting the VPN
Client application
In Expert Mode, click VPN > VPN Client. The VPN Client Connection Configuration
page appears, which combines all VPN client settings on a single Web page.
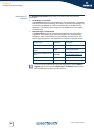
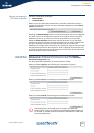
Outline of a VPN Client
configuration procedure
Perform the following steps to configure your VPN client:
1 In Expert Mode, select the VPN Client Web page from the VPN menu.
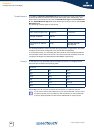
2 Fill out the various parameter fields in the VPN Client Web page.
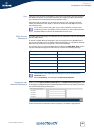
3 Select the IKE Authentication method. Either Preshared Key or Certificate
Authentication can be selected.
4 Select the Start Mechanism. Either manual dial-in or Automatic Start (Always
On) can be selected.
5 Click Add to confirm the data and Save All to save the configuration.
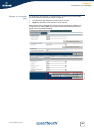
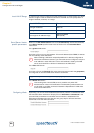
The configuration pages you encounter during this procedure are described in
detail below.