


E-15
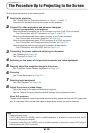
The Procedure Up to Projecting to the Screen
Perform setup adjustments in the following order.
1
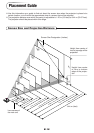
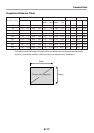
Position the projector
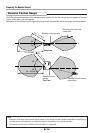
See “Screen Size and Projection Distance” on Pages E-16 and E-17.
Determine the locations to set up the screen and the projector.
2
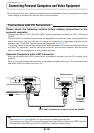
Connect the video equipment and personal computer
Connect your equipment to the projector.
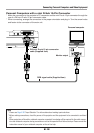
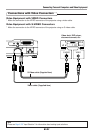
When the personal computer has a DVI connector or a mini D-sub 15-pin connector
See “Connections with PC Connectors” on Page E-18 or E-19.
When the video equipment has a video connector or an S-video connector
See “Connections with Video Connectors” on Page E-21.
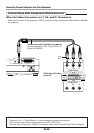
When the video equipment has a YCbCr connector or a YPbPr connector
See “Connections with Component Video Sources” on Page E-22.
When playing the audio through the built-in speaker of the projector
See “Connections with the AUDIO Jack” on Page E-23.
3
Connecting the power cable and switching on the power
See “Operating” on Page E-24.
See “Finishing” on Page E-25.
4
Switching on the power of the personal computer and video equipment
5
Properly adjust the projection image to the screen
See “Projection Screen Position Adjustment” on Page E-26.
6
Focusing
See “Focus Adjustment” on Page E-27.
7
Selecting input equipment
See “Input Selection” on Page E-28.
8
Adjust the screen or video image
Adjust the image to the optimum condition as required.
See the Table of Contents (Adjustments and Settings) for the adjustment items.
About DLP projectors
Though careful attention is paid to providing optimum quality, please note that with DLP type projec-
tors, in rare cases there may be black spots or bright spots among the picture elements.
Note
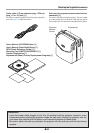
* Please purchase a screen.
* A DVI-D cable (Stock No. 205202), which is available separately, is required for connections with the DVI
connector of the personal computer.
* A component cable (Stock No. 205203), which is available separately, is required to connect a DVD player or
other equipment with YCbCr connectors.