39
Listening to the Radio—Continued
Naming Presets
You can name presets for easy identification using alpha-
betic, numeric, marks and symbols. The preset name
may contain up to eight characters.
Available Characters
A B C D E F G H I J K L M N O P Q R S T U V W X Y Z
a b c d e f g h i j k l m n o p q r s t u v w x y z
0 1 2 3 4 5 6 7 8 9
_@'<>#$%&* =;:+-/()?
! ’ ” , . (space) (insert)
À Á Â Ã Ä Å Æ Ç È É Ê Ë Ì Í Î Ï Ð Ñ Ò Ó Ô Õ Ö × Ø Ù Ú
Û Ü Ý Þ ß à á â ã ä å æ ç è é ê ë ì í î ï ð ñ ò ó ô õ ö ÷ ø ù
ú û ü ý þ ÿ ¡ ¢ £ ¤ ¥ ¦ § ¨ © ª « ¬
- ® ¯ ° ± ² ³ ´ µ ¶ · ‚ ¹ ° »
¼ ½ ¾ ¿
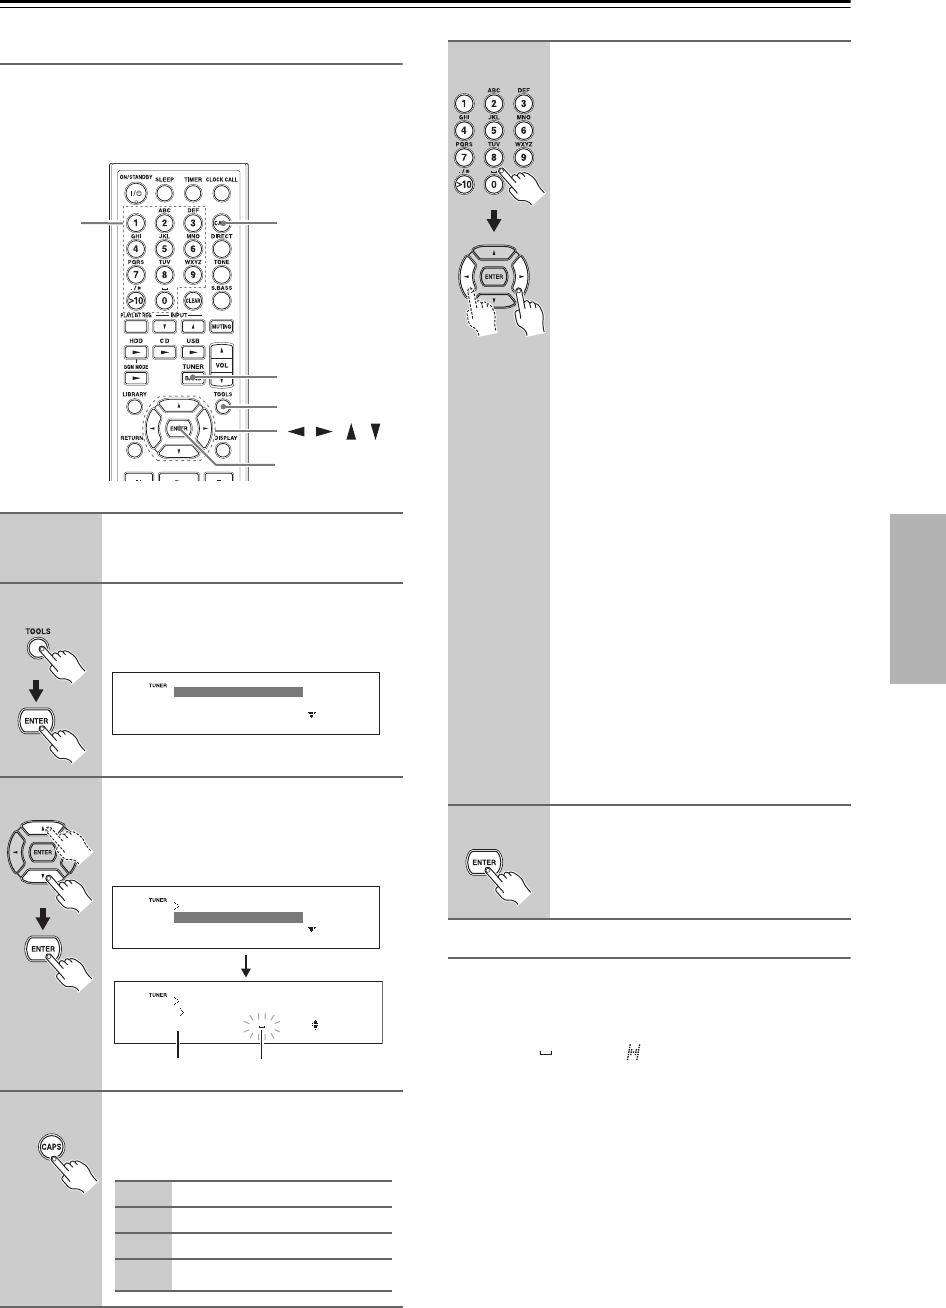
1
Select the preset you want to
name (see page 36).
2
Press the [TOOLS] button and
then press [ENTER] with “Tool”
selected.
3
Use the Up and Down [ ]/[ ] but-
tons to select “Name In”.
The CD/HDD receiver enters the charac-
ter input mode.
4
Press the [CAPS] button repeat-
edly to select one of the following
character groups:
/ / /
BAND
TOOLS
ENTER
CAPS
Number
buttons
Audio
Record
Tool
Tool
A ]
Name In?
Name Erase
Name In
Tool
Character group Input position
A] Uppercase letters
a] Lowercase letters
1] Numbers and symbols
£]
Umlaut letters and symbols
5
Selecting letters:
Press the number buttons repeatedly to
select the available letters. For example,
press the [2] button repeatedly to select:
A, B, or C.
Press the [0] button repeatedly to select:
0 or (space)
After you select a desired character,
move to the next input position by press-
ing the Left and Right [ ]/[ ] buttons.
Selecting numbers and symbols:
Use the number buttons to select num-
bers.
Press the [>10] button repeatedly to
select: (space) . / * - , ! ? & ' ( )
After you select a desired character,
move to the next input position by press-
ing the Left and Right [ ]/[ ] buttons.
Notes:
• Not all of the symbols can be entered by
using the number buttons. Use the Up
and Down [ ]/[ ] buttons to select from
the full range of symbols.
• Up to 8 characters can be input. If you
attempt to input ninth character, “Name
Full” is displayed. Proceed to the next
step.
Deleting/editing characters:
Inserting a new character:
Deleting preset's name:
See page 40.
To cancel the Name In function, press the
[RETURN] button.
6
Press [ENTER] to finish entering.
“Complete!” will be displayed, and the
preset has been named.
