


52
Setting
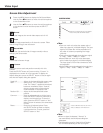
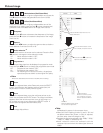
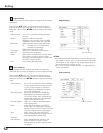
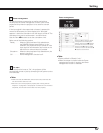
Edge blending
This function allows multiple projector images to be seamlessly
overlapped.
Use the Point ed buttons to move the red frame pointer to
Edge blending and then press the SELECT button to display a
dialog box. Use the Point ed7 8 buttons to adjust the setting
value.
Edge blending
. . Set to ‘On‘ to activate the Edge blending
function.
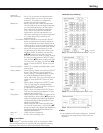
Width
. . . . . . . . . Adjust the width of correction.
Right/Left: Set the width. (from 0 to 960).
Top/Bottom: Set the width.
(from 0 to 540).
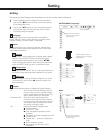
Black level . . . . . Adjust the black level of projected image.
All: The values of R, G, and B will be
changed simultaneously.
R/G/B: Adjust the value (± 127).
Test pattern
. . . . Select ‘On‘ to display a suitable pattern.
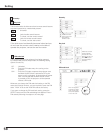
Menu off
. . . . . Close the menu temporarily.
Reset
. . . . . . . . . Select ‘Reset’ and press the SELECT button.
Then ‘Return to factory default of Edge
Blending?‘ message appears. To reset, press
the SELECT button at [Yes].
Quit
. . . . . . . . . . Exit the Edge blending menu.
Edge blending
Close this dialog box.
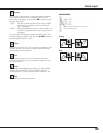
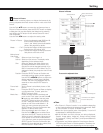
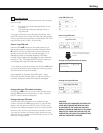
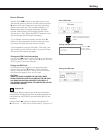
Color matching
When multiple sets are used simultaneously, this projector
allows the user to correct the difference of colors among the sets.
Use the Point ed buttons to move the red frame pointer to
Color matching and then press the SELECT button to display a
dialog box. Use the Point ed7 8 buttons to adjust the setting
value.
Color matching
. . . . Set to ‘On‘ to activate the Color matching
function. When the color matching is set
to ‘Off‘, all items except for Advanced
color matching are displayed in grayout
and cannot be adjusted.
Color adjustment
. . . Adjust the color setting of Red/Green/
Blue/White. The chromatic coordinate
(X,Y) of Red, Green, Blue, and White can
be adjusted respectively. The adjustable
range is from 0.000 to 1.000.
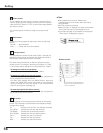
Auto test pattern
. . . Select ‘On‘ to display a suitable pattern
when setting items.
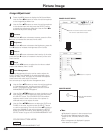
Reset
. . . . . . . . . . . . Select ‘Reset’ and press the SELECT
button. Then the confirmation message
appears. Press the SELECT button at [Yes]
to reset to the previously stored values.
Store
. . . . . . . . . . . . Select ‘Store’ and press the SELECT
button to display the Confirmation box. To
store adjusted data, select [Yes].
Advanced
color matching
. . . . . Select ‘Advanced color matching’ and
press the SELECT button for more
detailed settings. Another setting screen
will appear.
Color matching
Close this dialog box.
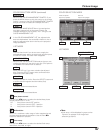
✔Note:
• The overlapping areas might become uneven depending on
the images. In such a case, it is recommended to decrease
the contrast of the images in the Image Adjust Menu or
set the BrilliantColor function to ‘Off’.
•
See “How to adjust multiple screens” on pages 92-93 for
further information.