


-15
Setup
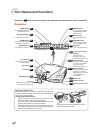
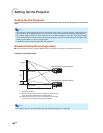
Projection (PRJ) Mode
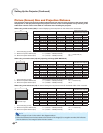
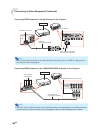
The projector can use any of the 4 projection modes, shown in the diagram below. Select the mode most ap-
propriate for the projection setting in use. (You can set the PRJ Mode in “Options” menu. See page 45.)
■ Table mounted, front projection
■ Ceiling mounted, front projection
Menu item ➞ “Front”
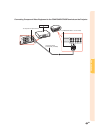
■ Table mounted, rear projection
(with a translucent screen)
Menu item ➞ “Rear”
Menu item ➞ “Ceiling + Front”
■ Ceiling mounted, rear projection
(with a translucent screen)
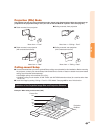
For details, refer to “Picture (Screen) Size and Projection Distance” on page 16.
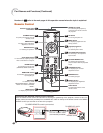
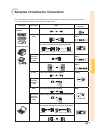
Example : When using a wide screen (16:9)
Indication of the Projection Image Size and Projection Distance
8'0" ~ 10'10"
(2.4 m ~ 3.3 m)
10'9" ~ 14'6"
(3.3 m ~ 4.4 m)
13'5" ~ 18'2"
(4.1 m ~ 5.5 m)
27'1" ~ 36'6"
(8.3 m ~ 11.1 m)
40'9" ~ 54'10"
(12.4 m ~ 16.7 m)
300"
200"
100"
80"
60"
261.5
"
×147.1
"
174.3
"
×
98.1
"
87.2
"
×49
"
69.7
"
×39.2
"
52.3
"
×
29.4
"
Picture Size
Projection
Distance
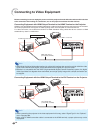
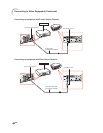
Ceiling-mount Setup
■ It is recommended that you use the optional Sharp ceiling-mount bracket for this installation. Before mounting
the projector, contact your nearest Sharp Authorized Service Center or Dealer to obtain the recommended
ceiling-mount bracket (sold separately).
• AN-CM250 ceiling-mount bracket (for U.S.A.).
• AN-NV6T ceiling-mount bracket, its AN-TK201 and AN-TK202 extension tubes (for countries other than
the U.S.A.).
■ Invert the image by setting “Ceiling + Front” in “PRJ Mode”. See page 45 for use of this function.
Menu item ➞ “Ceiling + Rear”