


52 Maintaining and Troubleshooting the 4000i
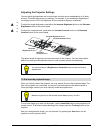
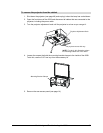
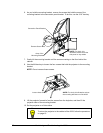
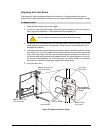
6. As you hold the mounting bracket, remove the screws that hold the arms of the
mounting bracket to the connection panel bracket. To do this, use the 3/16" hex key.
7. Gently tilt the mounting bracket until the arms are resting on the floor behind the
cabinet.
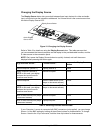
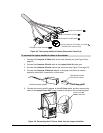
8. Use the M4 hex key to loosen the four screws that hold the projector to the mounting
bracket.
NOTE: Do not remove these screws.
9. Lift the projector forward to free the screws from the keyholes, and then lift the
projector clear of the mounting bracket.
10. Set the projector on a flat surface.
TIP
To return the projector to the cabinet of the 4000i, follow the procedure
on page 15.
Arms of the
Mounting Bracket
NOTE: For clarity, this
illustration doesn’t show the
side panel or any cables.
Connection Panel Bracket
Remove Screw Here
Loosen these screws
NOTE: For clarity, this illustration shows
the mounting bracket out of the 4000i.