


Maintaining and Troubleshooting the 4000i 57
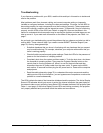
Troubleshooting
If you discover a problem with your 4000i, read the hints and tips in this section to isolate and
resolve the problem.
Most problems result from incorrect cabling, an incorrect computer setting or improperly
installed or configured software, including the video card settings. Of course, for the 4000i to
be working properly, its major components must be functioning correctly. These components
include the computer, projector and the interactive screen. To determine if they’re functioning
properly, use the LEDs on the 4000i (see Table 4 on page 58). Also use the tables in this
section to understand which component may be causing the problem and what steps you can
take to correct it. If you need more information on the states of the projector, see Table 1 on
page 7.
As you begin your troubleshooting, record the problems that you observe and what you did to
resolve them. These notes will help if you need to contact SMART Technical Support (see
page 79). Also try these general tips:
• Substitute hardware that you know is functioning with any hardware that you suspect
may be malfunctioning. For example, substitute your computer with another that you
know is working properly.
• Check all cable connections and system settings. Check the LEDs for the presence of
power or for the indication of a display problem.
• Completely shut down the system and then restart it. To do the shut down, shut down
the computer’s operating system. Then press the Projector Standby button on the
control panel to turn the projector off. Allow it to cool for three minutes and then
disconnect the main AC power cable from the room outlet. To power up the 4000i,
wait another 15 seconds and then plug the AC power back in. Power on the computer
and projector.
• Read the cable schematics (page 75) to understand the major components and the
cabling routes. With this information, you can bypass some components or reduce the
problem to a small subassembly.
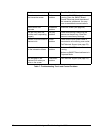
The LEDs indicate the state of the interactive whiteboard and the projector. The Active Display
Source LED indicates which input source is active (the internal computer, the guest laptop or
the external video source), while the Lamp Status LED indicates the state of the projector (see
Table 4 – next page). If the Active Display Source LEDs are blinking constantly, the projector
isn’t properly attached and you should check the cables and connections.