


13 | CHAPTER 3 – CONNECTING YOUR INTERACTIVE WHITEBOARD TO YOUR
COMPUTER
NOTE
In most cases, SMART Product Drivers is downloaded automatically when
you install SMART Notebook™ or SMART Meeting Pro™ software.
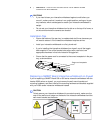
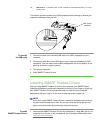
2. If it’s not already on, turn on your projector to see the projected computer image
on your interactive whiteboard.
3. Locate the installation program and follow the on-screen instructions to complete
the installation.
SMART Board Tools opens automatically.
4. If SMART Board Tools doesn’t open:
– If you have a Windows® computer, select Start > All Programs >
SMART Technologies > SMART Product Drivers > SMART Board Tools
– If you have a Mac computer, open Mac HD, and then select Applications >
SMART Product Drivers > SMART Board Tools.app.
The Ready light in your interactive whiteboard’s pen tray turns from flashing green
to solid green and the SMART software icon appears in the Windows notification
area or Mac Dock, indicating that your interactive whiteboard is communicating
successfully with SMART Product Drivers.
You can now pick up a pen from the pen tray and write over your desktop or any
projected application, and use all the other features of your SMART software. For
more information on using your SMART software, press the SMART software icon and
select Help.
Configuring your computer settings
For optimal configuration, use the following settings for the computer connected to
your interactive whiteboard.
Recommended settings
Configure your computer’s power management settings to turn off the monitor after
one hour of inactivity and to put the hard disks into standby mode after two hours.
This extended period prevents the computer from shutting down unexpectedly
(for example, during presentations or meetings that have gaps in computer activity).
Your computer will stop sending a video signal to your projector after a period of idle
time, which may trigger the projector to go into standby mode. Similarly, you can put
your projector in standby mode by following the manufacturer’s instructions included
with your projector. To change the settings, see the instructions included with your
operating system.