


Chapter 2: Installation
2-19
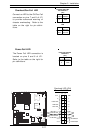
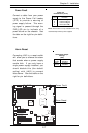
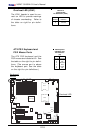
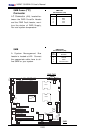
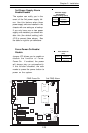
AC'97 Output & Audio Enable
AC'97 provides high quality onboard
audio. The X6DAT-G/X6DAi-G fea-
tures 6-channel sound for front L&R,
rear L&R, center and subwoofer
speakers. This feature is activated
with the Advanced software (on the
CD-ROM included with your mother-
board). Sound is then output through
the Line In, Line Out (JC2) and MIC
jacks(JC1) (see at right). Activate
AC 97 with the "AC 97 Audio" setting
in the Advanced Chipset Features
section of BIOS. To activate the On-
board Audio, please enable the
Jumper: JPAC. See the table on right
for pin definitions.
Line In(surround
sound L/R)
Green:
Line Out(Front L/R)
Pink:
MIC In (Center/
subwoofer)
Blue:
Jumper
Position
1-2
2-3
Definition
Enabled
Disabled
AC97 Enable/Disable
Jumper Settings (JPAC)
K
B
/
M
o
u
se
DIMM 4A
DIMM 4B
DIMM 3A
DIMM 3B
DIMM 2A
DIMM 2B
DIMM 1A
DIMM 1B
S
P
K
R
Tum
w
ater
(N
orthB
ridge)
(S
outh
B
ridge)
IDE #1
IDE #2
F
lo
p
p
y
F
a
n
4
USB2/3
JD2
J
F
1
FAN7
CPU1
CPU2
J
D
1
J24
USB 0/1
J
L
A
N
1
C
O
M
2
C
O
M
1
Parrallel
Port
Fan6
Fan5
J32
4-pin
PWR
Bank 1
Bank 1
Bank 2
Bank 2
Bank 3
Bank 3
Bank 4
Bank 4
ATX PWR
J1B4
JPF
Force
PW
J
L
A
N
1
Line_In/
Line_Out
J
P
A
C
S
I/O
x16 PCI EXP #6
PCI #5-33MHz
PCI#3-33MHz
PCIX#2-66MHz
J
2
7
C
D
1
C
D
2
PCIX#1-66MHz ZCR
G
LA
N
C
TR
L
JW
O
R
S
M
B
us
J
2
2
Fan3
JK
1
FAN1
J1D1
J
C
2
Mic
J
C
1
x8 PCI EXP #4
JW
O
L
JL1
J
A
R
J
O
H
1
J
P
1
5
JP12
M
arvell
FAN2
JWD
SATA0
SATA1 SATA0
SATA1
SATA2
M
arvell's
SATA3
S
A
T
A
A
C
T
L
E
D
B
attery
SATAI
2
C
JPS1
F
a
n
8
BIOS
JP
L
1
J
B
T
1
6041
6300ESB
JP13
Intel's
D
S
1
D
S
9
D
S
2
D
S
1
0
D
S
3
D
S
1
1
D
S
4
D
S
1
2
J
4
0
J
2
3
97' Audio
Audio Enable
JC2
JC1
JPAC
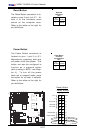
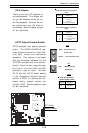
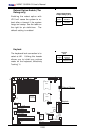
Audio CD Header Pin Definitions
(CD2)
Pin
Number
1
2
3
4
Definition
Right Stereo Signal
Ground
Ground
Left Stereo Signal
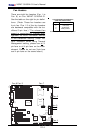
Audio CD Header Pin Definitions
(CD1)
Pin
Number
1
2
3
4
Definition
Left Stereo Signal
Ground
Ground
Right Stereo Signal
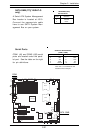
CD-In Header
There is two 4-pin CD headers on
the motherboard. This allows you
to use the onboard sound for au-
dio CD playback. Connect the au-
dio cables from your CD drive to
the header. See the tables at right
for pin definitions.