


28
Chapter 4 Web-based Management
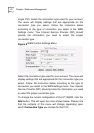
sites until the DNS settings are properly configured. Be
sure to configure this before you save the new settings and
restart the UT-300R2.
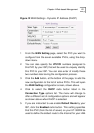
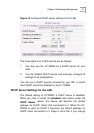
7 When you are satisfied that all the WAN settings are
configured correctly, click on the
Apply
button.
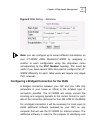
The new settings must be saved and the UT-300R2 must be
restarted for the settings to go into effect. To manually save and
reboot the UT-300R2, click on the
Tools
directory tab and then
click the
System
menu button. On the menu that appears, click
he Save & Restart button. The UT-300R2 will save the new
settings and restart. Upon restarting the UT-300R2 will
automatically establish the bridged WAN connection.
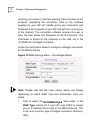
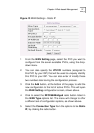
Dynamic IP Address for the WAN Connection
When the UT-300R2 is configured to use Dynamic IP Address
assignment for the WAN connection, a server on the ISP’s
network assigns the global IP address settings used for the
WAN connection. This is method is simply Dynamic Host
Control Protocol (DHCP) for the WAN. The UT-300R2 can be
configured to be a DHCP client and obtain its IP settings
automatically from the DHCP server maintained by your ISP.
Follow the instructions below to configure the UT-300R2 to use
Dynamic IP Address assignment for the WAN connection.