


50
Chapter 5 Advanced Configuration / Network Management
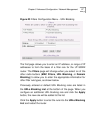
additional IP filter rule and click the
Apply
button, the new rule
will be added to this list.
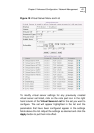
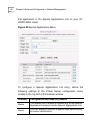
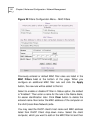
The first step in configuring an IP filter rule is to determine if you
want to Allow or Deny access. Click the appropriate radio
button under the
Action
field. You can also turn the IP filter rule
on or off using the
Enabled
or
Disabled
radio buttons under the
Status field. For easy reference, you can enter an
alphanumeric name in the
Name
field.
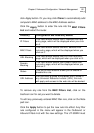
You can then specify the
Source for
packets to be filtered from
the drop-down menu. If the source is selected as
LAN
, then this
rule will apply to packets that are sent from PCs on your LAN to
the WAN (Internet). If the source is selected as
WAN
, then this
rule will apply to packets that are sent from PCs on the WAN. If
both
are selected, then this rule will apply to packets that are
sent from PCs on both the WAN and your LAN.
A similar situation applies to the Destination drop-down menu.
If the destination is selected as
LAN
, then this rule will apply to
packets that are to be sent to PCs on your LAN. If the
destination is selected as WAN, this rule will apply to packets
that are to be sent to PCs on the WAN. If
Both
is selected, then
this rule will apply to packets that are to be sent to PCs on both
the WAN and your LAN.
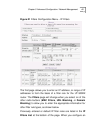
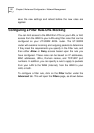
Next, you must enter either a single IP address or a range of IP
addresses in the
IP Range Start
and
IP Range End
fields.
Remember that IP addresses are in the form x.x.x.x
−
where x
varies from 0 to 255 − and that an IP address range must be
contiguous.