


Inverter/Charger Installation
2–30 975-0239-01-01
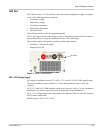
Parts List for Dual-Inverter Configurations
Installing an additional inverter using the power distribution panel requires an XW
Connection Kit (part number 856-1020), which contains the following components:
• XW Conduit Box
• Three 60 amp, 120/240 VAC, 2-pole, Square-D Type QOU, DIN-rail mount,
AC breakers for Inverter Input, Output, and Bypass
• Four Power Distribution bars
• Custom Bypass Interlock
• #6 AWG AC wiring to connect the inverter to AC breakers
• GJ250A, 160VDC, 3/8" Stud, DC Breaker with copper bus bar for DC positive
• one pair #4/0 battery cables to connect the inverter to DC breakers
• Xanbus and AC Sync Cable (CAT 5 cable with RJ45 connectors wired to T568A
standard).
• Miscellaneous bushings
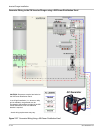
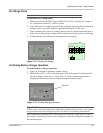
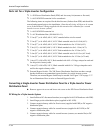
Converting a Single-Inverter Power Distribution Panel to a Dual-Inverter Power
Distribution Panel
◆ Remove upper wire cover and lower wire cover on the XW Power Distribution Panel.
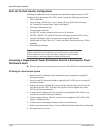
DC Wiring for a Dual-Inverter System
1. Remove positive distribution plate attached to bottom terminal on existing DC
disconnect/breaker.
2. Install second DC disconnect/breaker (supplied in 865-1020) next to existing DC
disconnect/breaker.
3. Replace the factory-installed DC positive bus bar with the larger positive bus bar
provided in the 865-1020. This larger DC positive bus bar supports up to three
GJ250 Adc disconnect/breakers.
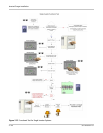
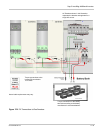
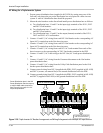
4. Connect positive battery cable for second inverter (supplied in 865-1020) to top
terminal on second DC disconnect/breaker.
5. Connect negative battery cable for second inverter (supplied in 865-1020) to DC
negative distribution plate.
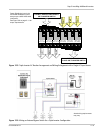
6. Connect positive and negative battery cables to second inverter.
7. Remove knockout on the lower cover for additional disconnect/breaker to fit through.
8. Re-install lower wire cover.
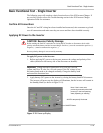
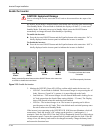
Important:
When installing more than one inverter at a location, a XW
System Control Panel will be required to give each inverter (as well as other
Xanbus-enabled devices) a unique name and to modify the factory-installed
default settings to match and support the installed configuration.