


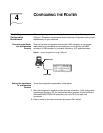

Installing Modules 25
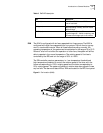
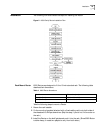
Figure 4 Location of Grounding Screw (PGND)
1 Connect the ground screw to the earth ground using a PGND cable, requiring a
grounding resistance less than 5-ohm. If you install the Router in a 19-inch
standard rack, you must also ground the rack.
WARNING: Be sure the router is grounded in the event of lightning.
Connect AC Power Cord AC power supply
AC power input range: 100 to 240V, 50/60Hz AC.
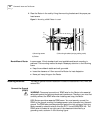
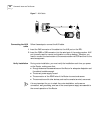
Figure 5 The power socket of an AC-input Router.
Recommended AC power socket
Use a 3-line single-phase power socket with a grounding terminal, which should
be reliably connected to the ground in the building. Make sure that the power
supply for the building has been well grounded before connecting the AC power
cord.
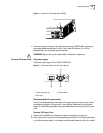
Connect AC Power Cord
1 Check that the PGND wire has been correctly connected to the ground.
2 Insert one end of the power cord accompanying the Router into the power socket
on the Router’s rear panel, fix the cable onto the cable-retention clip with a cable
(1)
(1)
(2) (3)
1) Cable-retention clip 2) Power switch
3) AC input