


2-10 CHAPTER 2: INSTALLING THE NETWORK DRIVER
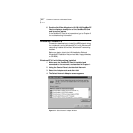
18 When Figure 2-4 appears again and asks for the
location of the files, type a:
19 Click Continue.
20 After Windows NT copies files, select new Network
Settings if required.
Ask your system administrator if you are not sure what
to select.
21 Click Continue to accept the resources.
22 If you are prompted for TCP/IP setup information,
enter it.
Ask your system administrator if you need help.
23 After the final files are copied, click Next, Next, and
then enter the computer name, workgroup, or domain.
■ The computer name is the name of your notebook. Give
your notebook a unique name (up to 15 characters, no
blank spaces).
■ A workgroup is composed of the computers that you
usually communicate with (like your department) and
contains shared resources (like printers).
■ If you use peer group networking, the workgroup name
is your peer group. Peers can see each other when they
look in the Network Neighborhood.
■ Your computer description is visible to other members
of your workgroup when they see your notebook in the
Network Neighborhood.
24 Click Next.
25 Click Finished.
26 Remove the LAN Installation Disk and click Yes to
reboot your notebook.
Installation is complete.