


Chapter 2: Installation December 20, 2004
2-6 LTPH-UM-1261-01
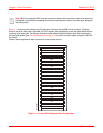
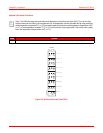
Adapter Bracket Mounting Procedure (ETSI-style Equipment Rack)
To mount the adapter brackets for a 600-mm ETSI-style Equipment Rack, mount the HMS-318 List 3 shelf to the
adapter brackets as described in this procedure.
Perform the following procedure to mount the HMS-318 List 3 shelf to the adapter brackets for a 600-mm ETSI-style
equipment rack.
Step Action
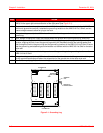
1 Locate the mounting holes of the HMS-318 List 3 shelf for the desired rack width 23 inches (58.4 cm) and
position (2- or 5-inch recess mounting).
2 Align each adapter bracket with the HMS-318 List 3 shelf and attach to the desired rack width 23 inches
(58.4 cm) and position (2- or 5-inch recess mounting) with the #6-32 x .25 inch screws (provided).
3 Insert the screws (4 places) and tighten using a #2 Phillips screwdriver.
4 Repeat for the other adapter bracket.
5 You are now ready to install the HMS-318 List 3 shelf into the telco-style rack (see “Rack Mounting
Procedure” on page 2-7).
Note: As mentioned in Chapter 1: “Product Description” on page 1-1 and “Mounting the HMS-318 List 3
Shelf” on page 2-4, the adapter brackets are attached to the HMS-318 List 3 shelf at the factory for a 19-
inch telco-style equipment rack. When disassembling the brackets from the shelf, ensure that you place the
appropriate hardware (screws, washers, and so on) you remove in a convenient sealed package for
possible re-assembly later.
Note: When mounting a 19-inch (48.3-cm) HMS-318 List 3 shelf into a 600-mm ETSI-style equipment rack,
use the adapter brackets provided (see “Product Description” on page 1-1 and Table 2-1 on page 2-2).
Step Action
1 Locate the mounting holes of the HMS-318 List 3 shelf for the desired rack width 23 inches (58.4 cm) and
position (2- or 5-inch recess mounting).
2 Align each adapter bracket with the HMS-318 List 3 shelf and attach to the desired rack width 23 inches
(58.4 cm) and position (2- or 5-inch recess mounting) with the #6-32 x .25 inch screws (provided).
3 Insert the screws (4 places) and tighten using a #2 Phillips screwdriver.
4 Repeat for the other adapter bracket.
5 You are now ready to install the HMS-318 List 3 shelf into the ETSI-style rack (see “Rack Mounting
Procedure” on page 2-7).