


SmartView XPro Installation and Use Page 15
IMPORTANT WARNING
Do not connect the SmartView's extender ports to an Ethernet hub or other
digital network device. The signals carried on the twisted pair cable between
the SmartView and the AdderLink are ANALOGUE. Plugging the SmartView or
AdderLink into a digital network device such as a hub may damage you
devices
Use of PS/2 and RS232 style mice with the SmartView - All of the mouse
connections from SmartView to PCs support either a PS/2 or an RS232 mouse.
SmartView automatically converts from the PS/2 mouse commands to RS232 serial
mouse commands. Serial mice types are selected by using an adapter as described
in Appendix A. The SmartView will operate without a mouse connected if you do not
wish to use one.
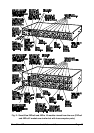
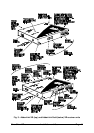
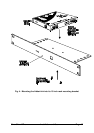
2.2 Mounting the SmartView
The SmartView XPro has been designed to be used either on a desktop or mounted
in a 19 inch rack. If the SmartView is to be used on a desktop then you will need to
stick the supplied self-adhesive rubber feet to the underside of the SmartView. If the
SmartView is to be mounted in a 19 inch rack then you will need to fit the rack
mounting brackets to the side of the SmartView. Do this using the brackets and
screws provided.
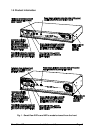
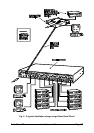
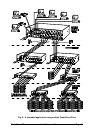
2.3 Connecting your devices
Ensure that the power is disconnected from the SmartView and all devices which
are to be attached. Connect any local keyboards, monitors and mice to the user port
connectors at the rear of the SmartView (see figure 2). The user ports are coloured
white and the individual connectors are colour coded for your convenience. If you
are connecting several KVM (Keyboard, Video monitor, Mouse) sets then you do not
need to use the same brands or mix of devices on each user port.