


A-2 64179008APL1-5A
4. Make the Customer Connections
(ADSL plus POTS)
Connect up to 12 ADSL plus POTS lines to the
customer using the following instructions:
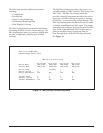
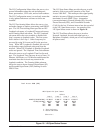
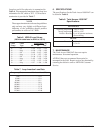
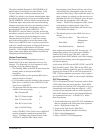
• Locate the 25-pair termination block on the right
side of the Total Access 1000 DAT.
• See Table 2 for pin assignments.
• Using a small flat-head screwdriver, lift the
appropriate pair connector.
• Insert the pair that is provided to the customer,
one wire into each hole, then push the pair
connector all the way in.
• Repeat these instructions for all additional
customer loops.
UL Deployment Guidelines
• Terminate enclosure to a reliable ground source.
• This unit shall be installed in accordance with the
requirements of NEC NFPA 70.
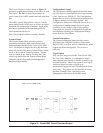
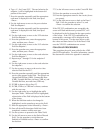
5. Make Ground Connections
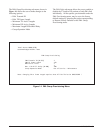
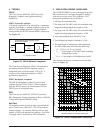
• Use Figure 4 to locate the ground bus/
connection.
• Connect the ground bus/connector to a reliable
ground source using 10 gauge (or greater) copper
conductor.
6. Apply Span Power
After the Total Access 1000 DAT’s ground bus has
been properly connected to a reliable ground source,
span power may be applied via the HDSL2 pairs. If
the H2LIU and PSU are installed, and three or more
spans are providing span power, the LEDs will
illuminate to indicate the Total Access 1000 DAT is
receiving the proper amount of power.
7. Installing Modules
To install a Total Access 1000 DAT module, grasp
the unit by the front panel while supporting the
bottom edge. Align the card edges to the guide
grooves and insert the unit until the edge connector
seats firmly into the backplane. Lock the card in
place by pushing in the locking lever in against the
front panel of the module.
PROVISIONING THE MODULES
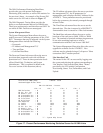
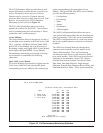
1. Logon to the System
The ADMIN interface (DB-9 connector) on the Total
Access 1000 DAT ATM BCU is used to change
provisioning options, obtain access module status
through menu screens, and initiate tests on circuits.
To access the menu screens, connect a VT100 terminal
or computer running a terminal emulation program to
the craft interface port using a standard male-to-female
RS-232, DB-9 cable. Craft port settings are as
follows:
• 9600 Baud
• No parity
• 8 Data bits
• 1 Stop bit
CAUTION
The ATM BCU retains provisioning setup when
removed from the chassis. If inserted into another
chassis, the provisioning setup is invoked on that
chassis’ access modules.
Windows HyperTerminal
Windows HyperTerminal can be used as a VT100
terminal emulation program. Open HyperTerminal by
selecting PROGRAMS / ACCESSORIES /
HYPERTERMINAL. Refer to the Help section of
HyperTerminal for additional information.
NOTE
To ensure proper display background in Windows
HyperTerminal, select VT100 terminal emulation
under SETTINGS.
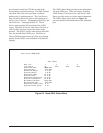
Password
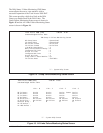
Upon initial connection, press the <Esc> key one time
to bring up the prompt for the Account Name. The
default Account Names are ADMIN, READWRITE,
and READONLY in all capital letters.
NOTE
All Account Names and Passwords are case
sensitive. The default Account Names and
Passwords should be entered in UPPER CASE.