


A-4 64179008APL1-5A
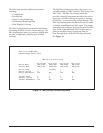
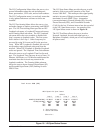
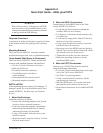
6. Type <C> for Create PVC. The card selection for
endpoint 1 will be highlighted in the bottom left
portion of the screen.
7. Press the spacebar repeatedly until the appropriate
card name is displayed in the field, then press
<Enter>.
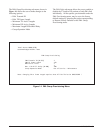
8. Use the right arrow to move to the port selection
field for endpoint 1.
9. Press the spacebar repeatedly until the appropriate
card name is displayed in the field, then press
<Enter>.
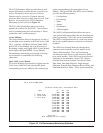
10. Use the right arrow to move to the VPI selection
field for endpoint 1.
11. Press the spacebar once, enter the appropriate
value, and then press <Enter>.
12. Use the right arrow to move to the VCI selection
field for endpoint 1.
13. Press the spacebar once, enter the appropriate
value, and then press <Enter>.
14. Use the right arrow to move to the card selection
field for endpoint 2.
15. Repeat steps 7 through 13 for the endpoint 2
values.
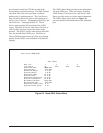
16. Use the right arrow to move to the card selection
for endpoint 1.
17. Use the up arrow to move to the service class
selection field for the PVC.
18. Press the spacebar repeatedly until the appropriate
service class appears in the field. The choices are
Unspecified Bit Rate (UBR), Constant Bit Rate
(CBR), Variable Bit Rate, real time (VBR-rt), and
Variable Bit Rate, non-real time (VBR-nrt).
19. If UBR is chosen, skip to Step 25.
20. If CBR, VBR-rt, or VBR-nrt is chosen, continue
with the next step.
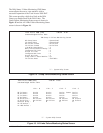
21. Use the right arrow key to highlight the traffic
descriptor fields. When each field is highlighted,
a description of the field is displayed at the bottom
of the screen.
22. When the field that needs to be changed is
highlighted, use the spacebar to access the field.
23. Enter the appropriate value followed by <Enter>.
24. Once all the traffic descriptor fields have been
completed, continue with the next step.
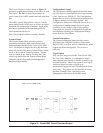
25. Use the up arrow to proceed to the Done? field.
26. Use the left arrow to move to the Packet Discard
field. Use the spacebar to switch between
Enabled or Disabled and use <Enter> to confirm
the decision.
27. Use the left arrow to move to the Circuit ID field.
28. Press the spacebar to access the field.
29. Enter the appropriate name for the circuit (do not
use spaces).
30. Use the right arrow to move back to the Done?
field. Press the spacebar to select Yes, and
<Enter> to confirm the selection.
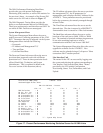
If the VPI/VCI combinations are acceptable, the
screen will flash and the newly created PVC will
be displayed in the list located in the upper portion
of the screen. If the VPI/VCI combinations are
unacceptable, a message will be displayed at the
bottom of the screen. Use the steps above to edit
the values and then choose Yes in the Done? field
once the VPI/VCI combinations are correct.
FOLLOW-UP PROCEDURES
This completes the quick start guide for the ADSL
plus POTS application. For more information, consult
the document to which this Appendix is attached.