


4-24-2
4-24-2
4-2
Chapter 4: BIOS setupChapter 4: BIOS setup
Chapter 4: BIOS setupChapter 4: BIOS setup
Chapter 4: BIOS setup
Windows
®
2000 environment
To create a set of boot disks for Windows
®
2000:
a. Insert a formatted, high density 1.44 MB floppy disk into the drive.
b. Insert the Windows
®
2000 CD to the optical drive.
c. Click
StartStart
StartStart
Start, then select
RunRun
RunRun
Run.
d. In the
Open Open
Open Open
Open field, type D:\bootdisk\makeboot a:
assuming that D is your optical drive letter.
e. Press <Enter>, then follow screen instructions to continue.
2. Copy the original or the latest motherboard BIOS file to the bootable
floppy disk.
4.1.24.1.2
4.1.24.1.2
4.1.2
ASUS EZ Flash utilityASUS EZ Flash utility
ASUS EZ Flash utilityASUS EZ Flash utility
ASUS EZ Flash utility
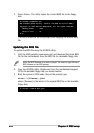
The ASUS EZ Flash feature allows you to update the BIOS without having to
go through the long process of booting from a floppy disk and using a
DOS-based utility. The EZ Flash utility is built-in the BIOS chip so it is
accessible by pressing <Alt> + <F2> during the Power-On Self Tests
(POST).
To update the BIOS using EZ Flash:
1. Visit the ASUS website (www.asus.com) to download the latest BIOS
file for the motherboard and rename the same to
P5MT-M.ROM.P5MT-M.ROM.
P5MT-M.ROM.P5MT-M.ROM.
P5MT-M.ROM.
2. Save the BIOS file to a floppy disk, then restart the system.
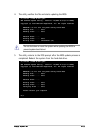
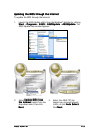
3. Press <Alt> + <F2> during POST to display the following.
EZFlash starting BIOS update
Checking for floppy...
4. Insert the floppy disk that contains the BIOS file to the floppy disk
drive. When the correct BIOS file is found, EZ Flash performs the BIOS
update process and automatically reboots the system when done.