


Basic Installation
12 AXIS 540+/AXIS 560
Section 1 Basic Installation
Quick overview
Follow these steps to make your printer network ready:
1. Connect the Hardware, on page 12
2. Assign an IP Address to the Print Server, on page 13
3. Making Network Printers available for printing on your PC, on page 18
Connect the Hardware
1. Make sure that the printer is switched off and that the Power Adapter is
disconnected
from the print server.
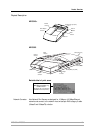
2. Locate the serial number, found on the underside label of the print server,
and write it down. Example: S/N: 00408c181cf0
3. Connect the printer directly to a port on the print server or using an
appropriate cable.
4. Connect the AXIS 5400+/AXIS 5600+ to your network (Ethernet Connector),
using a twisted pair RJ45 category 5 cable.
5. Switch on the printer and make sure it is ready for printing (display showing
“Online”, “Ready”, etc.)
6. Connect the Power Adapter to the print server. The Network Indicator will
start flashing when the print server is correctly connected to the network.
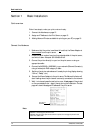
7. Wait 1 minute and press the test button once. A test page will be printed
on the connected printer — keep it handy during the installation. The test
page will show the assigned IP address of the print server.
Note:
Print server’s
IP address
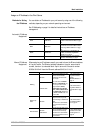
AXIS 540+: the test page is printed on LPT1.
AXIS 560: when all printer ports are attached to a printer, the test page is printed in this
order: LPT1, COM1, LPT2.