


Basic Installation
AXIS 540+/AXIS 560 15
Obtain an IP Address
using RARP in
UNIX/Linux
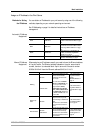
Follow the instructions below to set the IP address using RARP.
Append the following line to your Ethernet Address table. This is typically
located in the
/etc/ethers file:
Example:
1. Update, if necessary, your host table and alias name databases as required
by your system.
2. If it is not already running, start the RARP daemon. This is typically
performed using the
rarpd -a command.
3. Restart the print server to download the IP address.
4. You have now set the IP address of the print server. Continue to “Making
Network Printers available for printing on your PC” on page 18.
Note:
Obtain an IP address
using Auto-IP
Auto- IP is a scheme where devices allocate themselves an IP address at
random from the industry standard subnet of 169.254.x.x. AXIS print servers
are configured to support Auto-IP by default. See also “Auto-IP Addressing” on
page 3.
Manual IP address assignment
Set the IP Address
using ARP in
Windows 98/NT/
Me/2000/XP/2003
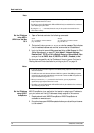
1. Open a Command Prompt and enter the following commands:
2. The host will return
reply from 192.168.3.191, or a similar message. This
indicates that the address has been set and that communication is
established.
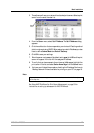
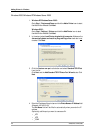
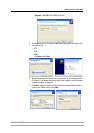
3. Log in to the print server’s Web pages (see Using a Web Browser for Print
Server Management, on page 87), select Admin | Network Settings |
Detailed View | TCP/IP and define Default Router and Subnet Mask. Make
sure you first set DHCP, Auto-IP, BOOTP and RARP (...Enabled) to No!
You have now set the IP address of the print server. Continue to “Making
Network Printers available for printing on your PC” on page 18.
<Ethernet address> <host name>
00:40:8c:10:00:86 npsname
You have to restart the print server to download the IP address.
Syntax Example
arp -s <IP address> <Ethernet address>
ping <IP address>
arp -s 192.168.3.191 00-40-8c-10-00-86
ping 192.168.3.191