


70 Bradyprinter 200M-e and 200M-e 300 User’s Guide
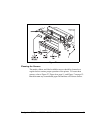
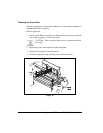
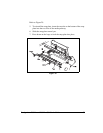
3ULQWKHDG3UHVVXUH$GMXVWPHQW
This adjustment may be necessary if printing is too light on one side or if
thick media is used. Refer to Figure 30.
1. Perform the toggle positioning procedure. If the problem is solved,
you may stop here; otherwise, continue with the rest of this procedure.
2. Print some labels at 2.4"/61 mm per second by running the PAUSE
Key Self Test (see page 79).
3. While printing labels, lower the darkness setting until a gray level of
printing is seen.
4. Loosen the knurled (upper) locking nuts at the top of the toggle
assembly/assemblies.
5. Increase or decrease spring pressure using the knurled (lower)
adjusting nuts on the shafts of the toggle until the left and right edges
of printed area are equally dark.
NOTE: Printhead life can be maximized by using the lowest
pressure that produces the desired print quality.
6. Increase darkness to the optimum level for the media being used.
7. Retighten locking nuts.
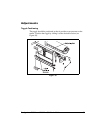
0HGLD6HQVRU3RVLWLRQ$GMXVWPHQW
See “Positioning the Media Sensors” on page 10.