


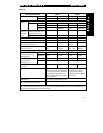

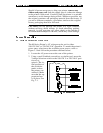
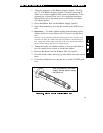
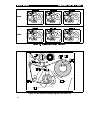

A user-replaceable AC Power Fuse is located just above the
Power ON/OFF Switch. (See Figure 2.1.) For a 100-120 VAC
installation, the replacement fuse is a 3AG Fast Blow style rated at
5 Amp/250VAC. For a 220-240 VAC installation, the fuse is the
same style but rated at 3 Amp/250VAC. Make sure the fuse you
use is correct for the voltage source.
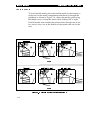
Before replacing the fuse, turn the AC Power Switch OFF and
unplug the AC Power Cable.
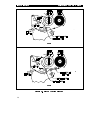
To replace the fuse, insert the tip of a flat blade screwdriver into
the slot in the end of the Fuse Holder End Cap. Press in slightly
on the End Cap and turn the screwdriver slightly
counter-clockwise. This will disengage the End Cap from the
Fuse Holder and allow you to remove the fuse. To install a new
fuse, reverse the procedure.
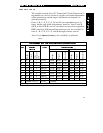
1. Confirm that the voltage selector switch is set to 120 V.
2. Attach the supplied power cord to the AC power receptacle lo-
cated on the rear of the printer.
3. Connect the opposite end of the power cord to a properly
grounded source of 100-120 VAC (50 or 60 Hz) power rated
for at least 5 Amps.
1. Confirm that the voltage selector switch is set to 240 V.
2. Depending on how the printer was ordered, a power cord may
or may not be provided for 220-240 VAC operation. If not pro-
vided, obtain a cord set with the proper AC Power plug. The
cord may then be connected to the standard (international)
IEC-type 3-prong AC connector provided on the M-Series
Printer. Refer to Appendix A for more information.
2-3