


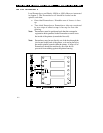


Once the material is loaded and the printer is calibrated, a sample
sleeve should then be printed to accurately center the printing on
the sleeve. Once you have centered the image on the sleeve, the
origin does not need to be readjusted again even when changing
sides in two-sided printing. If initially the print is not centered on
the sleeve, adjust your label format.
The Brady 200M printer is now ready for Permasleeve printing.
To save these settings permanently, press the MODE Key four
times.
1. Follow the instructions for One-Sided Permasleeve Printing to
print side one.
Note: There should be a five inch leader preceding printed
sleeves on side one. This will also serve as a trailer on side
two ensuring that all sleeves on side two will be printed. If
there is no trailer on side two, the printer will warn the
operator that the media is out and will not allow the last
five inches of sleeves to print.
2. Cut a five inch piece of empty carrier (leader) from the begin-
ning of the roll and splice it to the front of side two (with cel-
lophane tape) to serve as a leader. You should now have a five
inch leader and trailer on the swatch of material.
3. Turn Permasleeve over to print side two. The first sleeve
printed on side two should be the last sleeve printed from side
one. Brady Labelmark software will automatically invert the
order in which a batch is printed.
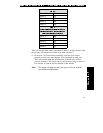
Example: If sleeve 1 represents the first sleeve ejected from the
printer and 001 represents the incremental information printed on
the sleeve sent in a batch format, the printing will occur as
follows:
F-4