


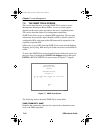
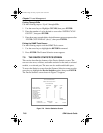


The SNMP Tools Screen
SEHI User’s Guide 7-19
3. Press ENTER. If there is no instance of that OID, the return code will
specify “MIB_NO_INSTANCE”, otherwise “DATA TYPE:”
appears.
4. Enter the data type for that OID. Possible choices are integer, string,
null, OID, IP address, counter, gauge, timeticks, and opaque.
5. Press ENTER. “DATA” appears.
6. Enter the value to correspond to the OID. If accepted, “<SET>
OPERATION CODE: XXXX <OK>” appears, otherwise an error
message appears.
Viewing Multiple OIDs
View several OIDs at one time to scan a MIB for specific information.
“WALK” scrolls through OIDs numerically sequential to the initial OID
request. “STEP” scrolls the MIB Walk, one OID at a time. Cycling allows
the user to specify how many GETNEXT commands to cycle through.
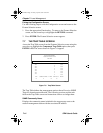
Walking Through OIDs
Use the following steps to “Walk” through OIDs:
1. Highlight WALK, using the arrow keys, then press ENTER.
“<INITIAL> OID (=|F9)” appears.
2. Enter the OID (minus the prepend) and press ENTER. The screen
begins walking through the sublayers of the MIB available from the
specified OID. Each OID listed displays the specified OID, its size, its
type, and the data it contains.
3. Press the SPACE bar to stop the walk, or wait for “***MIB WALK
COMPLETED***” to appear on the screen.
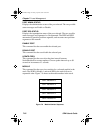
Stepping Through OIDs
Use the following steps to “Step” through OIDs (the user can step through
only after a GETNEXT):
1. Highlight STEP, using the arrow keys, then press ENTER. “Specify
OID” appears.
2. Enter the OID (only the suffix is necessary) and press ENTER. The
Tools screen begins to scroll one OID at a time, through all of the
sublayers of the MIB available for that OID.
SEHI Book Page 19 Friday, April 19, 1996 10:46 AM