


Advanced Guide
> Maintenance >
Aligning the Print Head Manually > Manual Print Head Alignment
U064
Manual Print Head Alignment
This section describes how to align the Print Head manually.
If the results of Automatic Print Head Alignment are not satisfactory, follow the procedure below to
perform Manual Print Head Alignment to precisely align the Print Head.
For details on performing Automatic Print Head Alignment, refer to Routine Maintenance
.
Note
Close the Inner Cover if it is open.
The print head alignment pattern is printed in black and blue only.
1.
Make sure that the machine is turned on.
2.
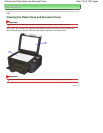
Load three sheets of A4 or Letter-sized plain paper in the Cassette.
3.
Open the Paper Output Tray gently, and open the Output Tray Extension.
4.
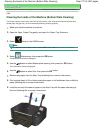
Select
Setup on the HOME screen.
Note
For details on how to select a menu on the HOME screen, refer to
Overview of the Machine
.
5.
Select
Maintenance, then press the
OK
button.
The Maintenance screen is displayed.
6.
Use the button to select Manual head alignment, then press the
OK
button.
The confirmation screen is displayed.
Note
To confirm the current setting, select Print the head alignment value and print the pattern.
7.
Use the
button to select Yes, then press the
OK
button.
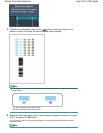
The print head alignment pattern is printed.
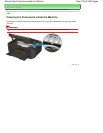
Important
Do not open the Scanning Unit (Cover) while printing is in progress.
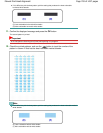
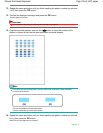
8.
When Did the patterns print correctly? is displayed, confirm that the pattern is
printed correctly, use the button to select Yes, then press the
OK
button.
The input screen for the head position adjustment values is displayed.
Page 781 of 1037 pagesManual Print Head Alignment