


3-6
Cisco ME 6500 Series Ethernet Switch Installation Guide
OL-8900-03
Chapter 3 Installing the Switch
Rack-Mounting
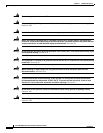
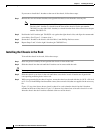
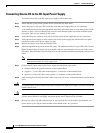
If you want to install the L brackets at the rear of the chassis, follow these steps:
Step 1 Remove the two rack-mount brackets and eight M4 flat-head screws from the accessory kit.
Note The L brackets are stamped with different part numbers to identify them as left and right.
The left-side L
bracket (as viewed from the front of the chassis) has the part number
700-20931-xx; the right-side L
bracket (as viewed from the front of the chassis) has the part
number 700-20932-xx.
Step 2 Position the left L bracket (p/n 700-20931-xx) against the right chassis side, and align the countersunk
screw holes. (See
Figure 3-1, bottom view.)
Step 3 Secure the L bracket to the chassis with four M4 x 8 mm Phillips flat-heat screws.
Step 4 Repeat Steps 2 and 3 for the right L bracket (p/n 700-20932-xx).
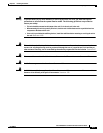
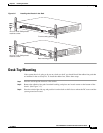
Installing the Chassis in the Rack
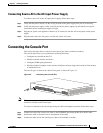
To install the chassis in the rack, follow these steps:
Step 1 Have one person carefully lift and position the chassis in front of the rack.
Step 2 Slide the chassis into the rack until the L brackets are in contact with the rack.
Tip Use a tape measure or a level to ensure that the chassis is installed level in the rack.
Step 3 Slide the chassis up or down in the rack until three screw holes in each L bracket are aligned with
corresponding mounting holes in the rack.
Step 4 While one person holds the chassis in place, secure the chassis to the rack with the six 10-32 x 3/4-inch
or 12-24 x 3/4-inch Phillips-head machine screws (three on each side) that are supplied in the accessory
kit.
Figure 3-2 (top view) shows how to install a chassis in a rack when the chassis has the L brackets
attached at the front of the chassis. Figure 3-2 (bottom view) shows how to install a chassis in a rack
when the chassis has the L brackets attached at the rear of the chassis.