


Setting Up and Configuring the WRVS4400N Wireless-N Router
Configuring the VPN Settings
Cisco WRVS4400N Wireless-N Gigabit Security Router with VPN Administration Guide 116
5
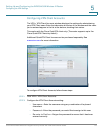
• Allow User to Change Password—Determines whether the user is allowed
to change their password.
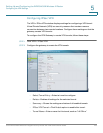
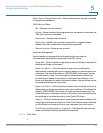
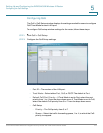
• VPN Client List Table
- No—Displays the user number.
- Active—When checked, the designated user can connect, otherwise the
VPN client account is disabled.
- Username—Displays the username.
- Edit button—Modify the username, password, or toggle between
whether the user is allowed to change their password.
- Remove button—Delete a user account.
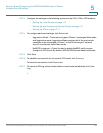
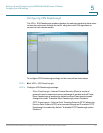
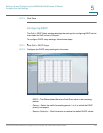
• Certificate Management
Use this section to manage the certificate used for securing the
communication between the router and QuickVPN clients.
- Generate—Click this button to generate a new certificate to replace the
existing certificate on the router.
- Export for Admin—Click this button to export the certificate for
administrator. A dialog asks you to specify where you want to store your
certificate. The default file name is “WRVS4400N_Admin.pem” but you
can use another name. The certificate for administrator contains the
private key and needs to be stored in a safe place as a backup. If the
router's configuration is reset to the factory default, this certificate can be
imported and restored on the router.
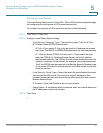
- Export for Client—Click this button to export the certificate for client. A
dialog asks you where you want to store your certificate. The default file
name is “WRVS4400N_Client.pem” but you can use another name. For
QuickVPN users to securely connect to the router, this certificate needs
to be placed in the install directory of the QuickVPN client.
- Import—Click this button to import a certificate previously saved to a file
using Export for Admin or Export for Client. Enter the file name in the field
or click Browse to locate the file on your computer, then click Import.
- Certificate Last Generated or Imported—Displays the date and time
when a certificate was last generated or imported.
STEP 3 Click Save.