


Chapter 5: Programming commands78
A776 (B780) Programming Guide A776-PG00001 C 12/09
Example:
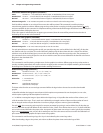
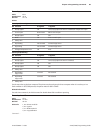
Activate watermark printing using logo #F1 (1F 03 16 02 s r) with “s” being the skip distance in dot rows before
activation and “r” is the distance in mm between watermark repetitions.
After executing a knife-cut command and the f = 1 steps, if s > 0, execute the following:
Skip “• s” (feed paper) dot rows (15 s command)
Set watermark printing to “on” using logo F1 (execute merge watermark mode -1D 8C • r F1 command). Logo
must be dened for F1 and comply with watermark mode requirements in order for this happen.
Stop background merging mode (1D 9B 1 command). Clears background for logos, barcodes, and captured •
images.
The watermarks feature is now activated (following an optional F0 logo) to start after each knife cut. Note that when
printing graphic objects, merging is turned o by each knife cut. The default value is s = 0 and turns o the f = 2
watermark link.
No correlation exists (when both are set) between watermark and logo skip distances.
If the f = 4 logo link is undened, you should set a null trailer logo with s = 1 and p = 144 (1F 03 16 04 1 90, no logo
at index F3). This will turn o watermarks at the position of a knife cut and leave a clear space at the top of the next
receipt.
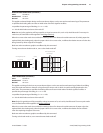
f = 3 link margin message printing
Example:
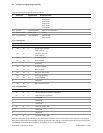
Activate margin message printing using logo #F2 (1F 03 16 03 s r t) with “s” being the skip distance, “r” the distance
between repetitions and “t” the toggle mode.
Toggle mode values for t:
0 = both left and right side
1 = toggle sides, starting with left side
2 = right side margin message only
3 = left margin message only
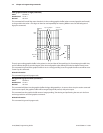
After executing a knife cut command and the f=1 steps, if s > 0, execute the following:
• skip“s” dot rows (=15 s command). When both watermark and margin message merging are dened, the
respective “s” values are treated independently. The same value should be used to start watermark and
margin message at the same place.
• Usethetogglemodevalueslistedabovetoapplymarginmessagefortheleftand/orrightside.Foramargin
message on both sides, enter the 1D 99 1 F2 p 0 command followed by the 1D 99 t’ F2 r t’ (apply margin
message) command with the logo at index F2 dened.
• suspendbackgroundmergingmode(=1D9B1command),soanylogos,barcodes,andcapturedimageswill
print in the clear
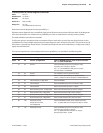
The margin message printing feature is activated after the header logo after a restart at each knife-cut. Note that when
printing graphic objects, merging is turned o by each knife cut. No correlation exists (when both are set) between
watermark and logo skip distances.
If the f = 4 logo link is undened, you should set a null trailer logo with s = 1 and p = 144 (1F 03 16 04 1 90, no logo at
index F3). This will turn o margin message at the position of a knife cut and leave a clear space at the top of the next
receipt.
Continued . . .