


GUIDE TO INSTALLATION
OINT-TO-POINT INSTALLATION P
he following can be used as a checklist to verify all the necessary steps to completT e
) e beginning of this manual.
par. 2.2 and position it at the
3)
Point-to-Point, Pass Through, RS232 Master/Slave, Fieldbus. See sub-
85 Full
For further
4) Configure the DS8100A scanner by installing and running the Genius™ configuration
•
installation of the DS8100A scanner.
Read all information in the section “Safety Regulations” at th1
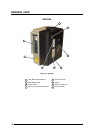
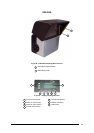
2) Correctly mount the scanner according to the information in
correct reading distance as shown in par. 2.5 and par. 4.4.
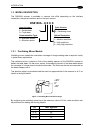
Make electrical connections to your DS8100A scanner by:
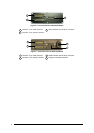
a) Connecting the DS8100A scanner to the C-BOX 100 by means of one of the
CAB-601X cables provided as accessory (see par. 1.5).
b) Providing correct and complete system cabling through the C-BOX 100 according to
the signals necessary for the layout of your application (trigger, inputs, outputs).
• Layout:
paragraphs under 2.6 for reference.
• Cabling: Power, Main Serial Interface – RS232, RS485 Half Duplex, RS4
Duplex, 20 mA Current Loop, Auxiliary Interface, Inputs, Outputs, etc -.
details, see all sub-paragraphs under par. 2.3.
program from the CD-ROM provided. The main steps are:
Select the codes to be read
• Set-up the communication parameters
• When PackTrack™ is required, perform PackTrack™ calibration
• Define data formatting parameters
NOTE
in Genius™.
Fine tuning of the scanner position for barcode reading can be
accomplished by performing a test through the SPY configuration tool
5) xi
The installation is now complete.
E t the configuration program and run your application.
xi