


Using the Printer 43
Using Fax Console (Windows XP Only)
Install Fax Console
1 Click Start →Control Panel.
2 Click Add or Remove Programs.
3 Click Add/Remove Windows Components.
4 Click to select Fax Services.
5 Click Next.
If prompted, insert the Microsoft Windows XP CD, and then click OK. Close the
Welcome to Microsoft Windows XP window when it opens.
6 Click Finish.
7 Close the Add/Remove Programs window.
Configure Fax Console
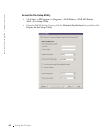
1 Click Start →All Programs (or Programs) → Accessories →Communications →
Fax
→ Fax Console.
The Welcome to Fax Configuration Wizard appears.
2 Click Next.
3 Enter any appropriate information, and then click Next.
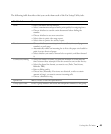
4 Select your data/fax modem in the drop-down menu under Please select the fax
device.
5 Select or de-select the Enable Send and Enable Receive check boxes as desired, and
then click Next.
NOTE: De-selecting the Enable Send check box prevents you from sending faxes. Selecting the
Enable Receive check box allows you to receive faxes.
6
Enter your TSID information, and then click Next.
7 Enter your CSID information, and then click Next.
8 Click to select Print it on. Use the drop-down menu to the right of this field to select
Dell AIO Printer A960 if you want to print all received faxes.
9 To create an archive copy of each fax, click to select Store a copy in a folder, and then
use the Browse button to select the desired archive location.
10 Click Next, confirm your settings, and click Finish.