


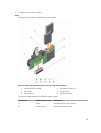
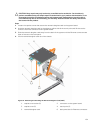
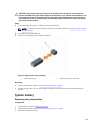
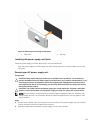
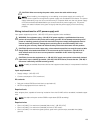

Figure 44. Installing the system battery
1. system battery 2. positive side of the battery connector
Next steps
1. Install the cooling shroud.
2. Follow the procedure listed in After working inside your system.
3. While booting, press <F2> to enter the System Setup and ensure the battery is operating properly.
4. Enter the correct time and date in the System Setup Time and Date fields.
5. Exit System Setup.
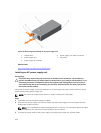
Power supply units
Your system supports one of the following:
• Two 495 W, 750 W, or 1100 W AC power supply modules
• Two 1100 W DC power supply modules
• Two 750 W mixed mode power supply modules
NOTE: Titanium power supply unit is nominally rated for 200 V AC to 240 V AC input only.
CAUTION: For AC power supply units, use only power supply units with the Extended Power
Performance (EPP) label on the back. Mixing power supply units from previous generations of
servers can result in a power supply unit mismatch condition or failure to power on.
NOTE: When two identical PSUs are installed, power supply redundancy (1+1 – with redundancy or
2+0 – without redundancy) is configured in system BIOS. In redundant mode, power is supplied to
the system equally from both PSUs when Hot Spare is disabled. When Hot Spare is enabled, one of
the PSUs will be put into standby when system utilization is low in order to maximize efficiency.
NOTE: If two power supply units are used, they must be of the same maximum output power.
105