


2
Performing initial system configuration
After you receive your system, you must set up your system, install the operating system if it is not pre-
installed, and set up and configure the system iDRAC IP address.
Setting up your system
1. Unpack the system.
2. Install the system into the rack. For more information about installing the system into the rack, see
your system Rack Installation placemat at Dell.com/poweredgemanuals.
3. Connect the peripherals to the system.
4. Connect the system to its electrical outlet.
5. Turn the system on by pressing the power button or by using iDRAC.
6. Turn on the attached peripherals.
Setting up and configuring the iDRAC IP address
You can set up the Integrated Dell Remote Access Controller (iDRAC) IP address by using one of the
following interfaces:
• iDRAC Settings utility.
• Dell Lifecycle Controller.
• Dell Deployment Toolkit.
• System LCD panel.
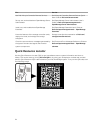
• Quick Sync (optional)
You can configure iDRAC IP using:
• iDRAC Web Interface.
For more information, see the Integrated Dell Remote Access Controller User's Guide.
• Remote Access Controller ADMin (RACADM).
For more information, see the RACADM Command Line Interface Reference Guide and the Integrated
Dell Remote Access Controller User's Guide.
• Remote Services that includes Web Services Management (WS-Man). For more information, see the
Lifecycle Controller Remote Services Quick Start Guide.
For more information on setting up and configuring iDRAC, see the Integrated Dell Remote Access
Controller User's Guide at Dell.com/idracmanuals.
Logging in to iDRAC
You can log in to iDRAC as an iDRAC local user, a Microsoft Active Directory user, or a Lightweight
Directory Access Protocol (LDAP) user. You can also log in by using Single Sign-On or a Smart Card. The
25