


76 Installing System Components
c
W
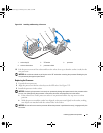
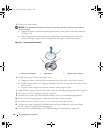
hen the processor is fully seated in the socket, rotate the socket release lever back down until
it snaps into place, securing the processor.
See Figure 3-22.
d
Close the processor shield. See Figure 3-22.
4
Install the heat sink.
a Using a clean lint-free cloth, remove the existing thermal grease from the heat sink.
NOTE: If you did not receive a replacement heat sink, use the heat sink that you removed in "Removing the
Processor" on page 73.
b
Remove the protective sheet from the thermal grease layer on top of the processor. If you
receive the processor without the thermal grease pre-applied, open the grease packet included
with your processor kit and apply thermal grease evenly to the top of the processor.
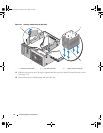
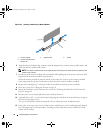
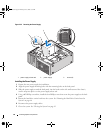
c Place the heat-sink assembly back onto the heat-sink assembly bracket. See
Figure 3-21
.
d Rotate the heat-sink assembly down towards the system base and tighten the four capture
screws.
5
Close the processor access door.
6
Ensure that all connectors are properly cabled and firmly seated.
7
Rotate the hard-drive carrier back into place. See "Rotating the Hard-Drive Carrier Into the System" on
page 46).
8
C
lose the system. See
"Closing the System" on page 43.
9
Reconnect the system to the electrical outlet and turn on the system and attached peripherals.
A
s the system boots, it detects the presence of the new processor and automatically changes the
system configuration information in the System Setup program.
10 Press <F2>
to enter the System Setup program, and check
that the processor information matches the
new system configuration
. S
ee
"Using the System Setup Program" on page 27
for instructions about
using the System Setup program.
11 Run the system diagnostics to verify that the new processor operates correctly
. S
ee
"Running the
System Diagnostics" on page 113
for information about running the diagnostics and troubleshooting
processor problems.
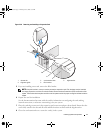
Memory
You can upgrade your system memory to a maximum of 8 GB by installing 533MHz or, when available,
667MHz fully buffered DIMMs (FBDs) in dual sets of 256-MB, 512-MB, 1-GB, or 2-GB. The memory
sockets are located on the system board beneath the rotatable hard-drive carrier. See Figure 6-2.
NOTICE: If you remove your original memory modules from the system during a memory upgrade, keep them
separate from any new memory modules that you may have. Use only 533 MHz or, when available, 667 MHz FBDs.
book.book Page 76 Monday, June 5, 2006 1:51 PM