


90 Installing System Components
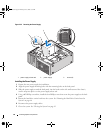
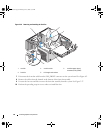
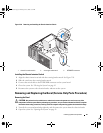
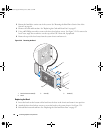
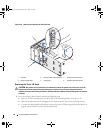
Figure 3-30. Removing and Installing the Front I/O-Panel
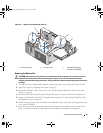
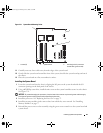
Replacing the Front I/O Panel
CAUTION: Only trained service technicians are authorized to remove the system cover and access any of the
components inside the system. Before performing any procedure, see your Product Information Guide for
complete information about safety precautions, working inside the computer and protecting against electrostatic
discharge.
1
If you are replacing the I/O panel, perform the following steps:
a
Remove the screw attaching the new I/O board to the mounting bracket. See Figure 3-30.
b
Slide the board to the side to disengage the two hooks from the slots in the mounting bracket.
c
Connect the thermal diode cable that you removed in step 8 of "Removing the Front I/O Panel" on
page 89 to the connector on the new I/O panel board.
1 I/O panel 2 thermal diode cable connector 3 I/O board mounting screw
4 thermal diode cable 5 holding tab 6 assembly mounting screw
1
6
5
2
3
4
book.book Page 90 Monday, June 5, 2006 1:51 PM