


Maintaining Your Printer 134
3. Right-click the printer icon on the taskbar, then select Print Head Alignment.
If the printer icon does not appear, refer to the following section to add the icon.
& See “From the Shortcut Icon on the Taskbar” on page 15.
4. Follow the on-screen instructions to align the print head.
Using the Print Head Alignment Utility for Mac OS X
Follow the steps below to align the print head using the Print Head Alignment utility.
1. Make sure that no lights are indicating errors.
2. Make sure letter/A4 size paper is loaded in the sheet feeder.
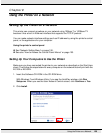
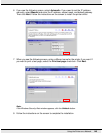
3. Access the EPSON Printer Utility3 dialog.
& See “Accessing the Printer Driver for Mac OS X” on page 15.
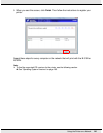
4. Click the Print Head Alignment button in the Utility dialog.
5. Follow the on-screen instructions to align the print head.
Using the Control Panel
Follow the steps below to align the print head using the control panel.
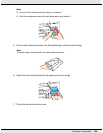
1. Make sure that letter/A4 size plain paper is loaded in the front paper cassette.
2. Make sure that READY appears on the LCD screen, and then press the r Right button.
Menu appears on the LCD screen.
3. Press the d Down or u Up button to select MAINTENANCE, and then press the OK or
r Right button.
4. Press the d Down or u Up button to select HEAD ALIGNMENT, and then press the OK or
r Right button.
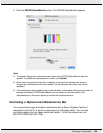
5. Press the OK button to print the alignment pattern.
6. Look at the alignment patterns and find the square without any visible bands in sets #1
through #4.