


EPSON AcuLaser C1100 Revision B
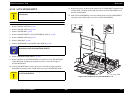
DISASSEMBLY AND ASSEMBLY PH ASSY 325
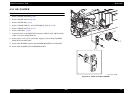
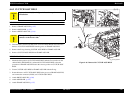
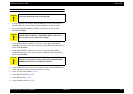
4.4.2 CHUTE ASSY-REAR
REMOVAL
1. In the case of the DUPLEX specification, remove DUPLEX ASSY. (p.412)
2. In the case of the standard specification, remove COVER-PH. (p.324)
3. Open CHUTE ASSY-REAR.
4. Bend the attachment section on the right side of CHUTE ASSY-REAR with a
small screwdriver or similar tool, remove the right-side boss from the hole on
FRAME-PH, and remove CHUTE ASSY-REAR.
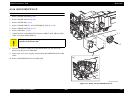
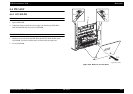
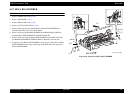
REINSTALLATION
1. Insert the left-side boss on CHUTE ASSY-REAR into the hole on the left side of
FRAME-PH, insert the right-side boss on CHUTE ASSY-REAR into the hole on
the right side of FRAME-PH so that it slides in from a diagonal direction, and
attach CHUTE ASSY-REAR.
2. Close CHUTE ASSY-REAR.
3. In the case of the standard specification, attach COVER-PH. (p.324)
4. In the case of the DUPLEX specification, attach DUPLEX ASSY. (p.412)
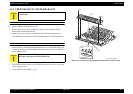
Figure 4-41. Removal of CHUTE ASSY-REAR
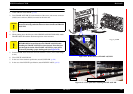
C A U T I O N
Step numbers with [ ] in the figure indicate the step of
reinstallation.
C A U T I O N
When performing the following work, take care not to damage the
CHUTE ASSY-REAR boss.
C A U T I O N
When performing the following work, take care not to damage the
CHUTE ASSY-REAR boss.
Leg_Sec03_055EA
4)-2
[1)]4)-1