


EPSON AcuLaser C1100 Revision B
DISASSEMBLY AND ASSEMBLY TRANSFER 343
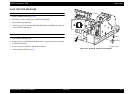
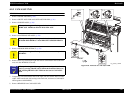
REINSTALLATION
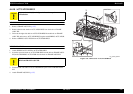
COVER ASSY-RR 2ND
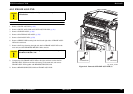
1. Lead out the connector of the harness of COVER ASSY-RR 2ND from the hole on
the main unit.
2. Match the boss on COVER ASSY-RR 2ND with the hole on the main unit, and
attach COVER ASSY-RR 2ND.
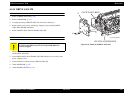
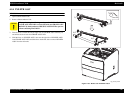
3. Lead out the relay connector connected to the connector on CHUTE ASSY-FSR to
the outside from the left-side notch on COVER ASSY-RR 2ND.
4. Fasten COVER ASSY-RR 2ND to the main unit with the 2 screws (silver, with
flange, 8 mm).
5. Connect connector (P/J621) on the harness of COVER ASSY-RR 2ND to the
main unit, and fasten the harness by the clamp.
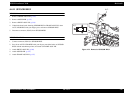
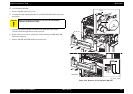
CHUTE ASSY-FSR.
1. Attach the connector (P/J620) on CHUTE ASSY-FSR connected to the main unit,
and insert the connector into the main unit from the left-side notch on COVER
ASSY-RR 2ND.
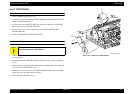
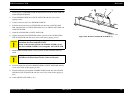
2. Fit the U groove on the both the left- and right-side hinges of CHUTE ASSY-FSR
into the shaft on CAM ASSY-2ND, and attach CHUTE ASSY-FSR to the main
unit.
3. Close CHUTE ASSY-FSR.
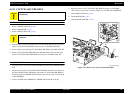
4. Attach COVER ASSY LH. (p.295)
C A U T I O N
When performing the following work, take care to prevent the
harness from being sandwiched between the main unit and COVER
ASSY-RR 2ND.