


EPSON AcuLaser C1100 Revision B
DISASSEMBLY AND ASSEMBLY DUPLEX 439
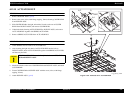
4.12.23 PAD DAMPER R
REMOVAL
1. Remove DUPLEX ASSY. (p.412)
2. Remove COVER-R DUP. (p.413)
3. Remove HINGE ASSY R. (p.435)
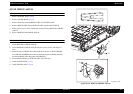
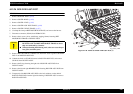
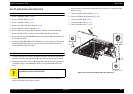
4. Remove the screw (silver, with flange, 6 mm) fastening BRACKET PAD R
LOWER to BRACKET ASSY R.
5. Remove BRACKET PAD R LOWER from BRACKET ASSY R together with
PAD DAMPER R.
6. Peel off and remove PAD DAMPER R from BRACKET ASSY R and BRACKET
PAD R LOWER.
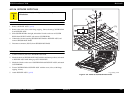
REINSTALLATION
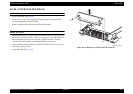
1. Cleanly peel off any old double-sided adhesive tape from the attachment surfaces
of BRACKET ASSY R and BRACKET PAD R LOWER, and wipe off with drum
cleaner or similar solution.
2. Peel off the protective paper from the dual-sided adhesive tape of PAD DAMPER
R, and affix PAD DAMPER R to the affixing surfaces of BRACKET ASSY R and
BRACKET PAD R LOWER.
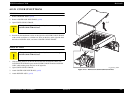
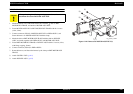
3. Match the hole on BRACKET PAD R LOWER with the boss on BRACKET
ASSY R, and attach BRACKET PAD R LOWER together with PAD DAMPER
R.
4. Fasten BRACKET PAD R LOWER to BRACKET ASSY R with the screw
(silver, with flange, 6 mm).
5. Attach HINGE ASSY R. (p.435)
6. Attach COVER-R DUP. (p.413)
7. Attach DUPLEX ASSY. (p.412)
Figure 4-139. Removal of PAD DAMPER R
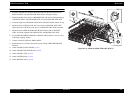
C A U T I O N
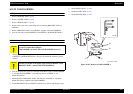
The shapes of the left and right PAD DAMPERs are different. Take
care not to confuse these dampers.
PAD DAMPER L is broad, while PAD DAMPER R is narrow.
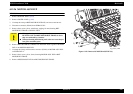
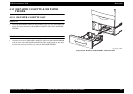
C A U T I O N
When performing the following work, match PAD DAMPER R
with the area shown in the Figure right, located on BRACKET
ASSY R and BRACKET PAD R LOWER, and then affix PAD
DAMPER R,
Leg_Sec03_514EA
CAUTION
5)
4)
6)
6)