


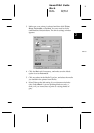
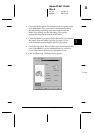

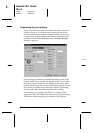

5. Make sure the paper size you loaded in the printer is selected
in the Paper Size list. If you don’t see your paper size in the
list, use the arrows to scroll through the list.
Note:
If your paper size is not included in the list, select
User Defined
and enter the paper size dimensions in the dialog box that
appears. For information on the User Defined setting, see online
help.
6. Check the Copies option. You can click the arrows or type a
number in the box to make this setting.
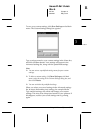
7. Check the Orientation option. The effect of your orientation
setting is shown in the display to the left.
Note:
Always load paper into the sheet feeder short edge first. Load
envelopes flap edge first with the flap side down.
8. Click the
OK
button at the bottom of the window.
Note:
You can get more information on the printer driver settings by
clicking the
Help
button at the bottom of the window. For more
details on making the printer driver settings, see the next section.
Making Changes to Printer Driver Settings
As described in Chapter 2, the printer driver lets you choose
from a wide variety of settings to get the best results from your
printer.
The quickest and easiest way to start printing is to leave the
Mode option set to Automatic on the Main menu. This way you
only need to check the Media Type, Ink, and Paper Size
settings, as described on page 2-22.
L
Hawaii2 Ref. Guide
Rev.b
A5 size Chapter 3
06-02-97 DR, pass 0
3-6
Using the Printer Software