


Basic Printing
1-4
10. Click
OK or Print in your application’s printing dialog box.
You may need to click a sequence of these buttons,
depending on the application you are using.
While your document is printing, the EPSON Progress
Meter (Windows 95) or the EPSON Despooler dialog box
(Windows 3.1) appears, showing the printing progress and
the status of your printer. (See “Checking Printer Status”
on page 1-5 for more information.)
Setting Default Printer Options
When you change printer settings through your software
application, the settings apply only to the application you’re
using. To adjust the default settings for all your Windows
applications, you must access the dialog box through the
Windows 95 or Windows NT 4.0 Printers utility or the
Windows 3.1 Control Panel.
Make sure all your software applications are closed before you
start. If not, you’ll have to close and then reopen them to have
the new default settings take effect.
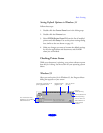
Setting Default Options in Windows 95
or Windows NT 4.0
Follow these steps:
1. Click
Start, point to Settings, and then select Printers.
2. Right-click the
EPSON Stylus Photo EX icon in the
Printers window.
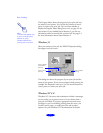
3. Select
Properties (Document Defaults in Windows NT).
Then click the
Main tab.
You see the printer settings dialog box, as shown on
page 1-2. Any changes you make will become the default
settings for all your applications and documents. Click
OK
when you are finished.
Note:
Some application settings
override default printer
settings (such as Paper
Size or Orientation), so it’s
a good idea to check
the settings in your
application before
you print.
Note:
You can access the
default Windows NT
printer software settings
only if you have the
appropriate network
access privileges, such as
Administrator or Power
User.