


Calibrations and Custom Test Standards
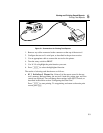
Configuring a Custom Cable
6
6-5
To configure a custom cable, proceed as follows:
1. Turn the rotary switch to SETUP.
2. Press $Page Down five times.
3. Highlight the custom cable configuration; then press E to see the menu
of custom cable names. The default cable names are
*Custom Cable 1* through *Custom Cable 4*. You can
change the cable name after configuring the test parameters. An asterisk
always proceeds and follows the name of a custom cable configuration.
4. Use D U to highlight the custom cable name you want to configure; then
press E.
5. To select a new baseline test standard, press E. Highlight the desired
test standard; then press E.
6. To change the parameters of the test standard shown on Page 1 of 6, use
#Page Up, $Page Down, and D U to highlight the parameter
you want to change; then press E.
7. Use the appropriate keys to select the value you want; then press E.
If you selected to change the custom cable name or the cable type, the
alphanumeric entry screen appears. Use the appropriate keys to enter a name
up to 27 characters long. When you are finished entering characters, press
S.
8. Repeat steps 6 and 7 to change additional parameters.
9. When you are finished configuring test parameters, press S to store the
custom configuration.