


freeView IP 800 User’s Manual
6
1 Quick Installation Guide
1.1 Introduction
The freeView IP 800 redirects local keyboard, mouse and video data to a remote administration
console. All data is transmitted via IP. The freeView IP 800 can also be used in a multi
administrator and multi server environment. Also, the freeView IP 800 is a KVM switch which can
be used with a local console.
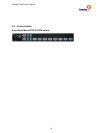
1.2 Hardware Installation
In order to connect to the freeView IP 800, perform the following steps:
1. Connect the power supply to the freeView IP 800.
2. Connect the monitor to the freeView IP 800.
3. Connect the keyboard to the freeView IP 800.
4. Connect the mouse to the freeView IP 800.
5. Plug the HDDB-15 pin connector of a 3-in-one KVM cable into Port 1 on the rear of the
freeView IP 800 unit. Then connect the HDDB-15 pin male type for PC video, the purple
Mini-Din 6 pin female type for the keyboard and the green Mini-Din 6 pin female type for a
mouse into the respective ports on the computer.
6. Repeat step 5 for each PC being connected to the freeView IP 800.
7. Connect the Ethernet cable and/or analog modem, depending on how you want to access
freeView IP 800.
1.3 Video Modes
The freeView IP 800 supports many common video modes. Please refer to Appendix C for a list
of all supported video modes.
1.4 Initial IP Configuration
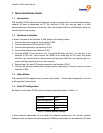
By default, the freeView IP 800 uses the network parameters shown in Table 1-1.
Parameter Value
IP auto configuration DHCP
IP-Address None
Net-mask 255.255.255.0
Default-Gateway None
Table 1-1: Default Network Settings
If these network parameters do not match the network configuration, the device's network
settings can be configured using the program KVMSetup.exe located on the installation CD after