


178
- Appendix A: WLAN User’s Guide
Confirming the computer and work group names
1 Click the [Start] button, then [Control Panel].
2 If the Control Panel is in Category view, switch to Classic view by clicking “Switch to Classic View” under Control
Panel the left frame. (If you are already in Classic view, “Switch to Category View” will be displayed.)
3 Double-click the [System] icon. The [System Properties] window will be displayed.
4 Click the [Computer Name] tab.
5 Confirm the settings of [Full computer name:] and [Workgroup:].
a. The setting of [Full computer name:] denotes the name for identifying the computer. Any name can be
assigned for each personal computer
.
Enter the desired name in less than 15 ASCII character code format. Identifiability can be enhanced by
entering the model number, the user name, and other factors.
b. [Workgroup name] is the group name of the network. Enter the desired name in less than 15 ASCII character
code format.
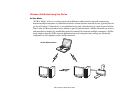
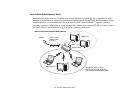
For ad hoc connection: Assign the same network name to all personal computers existing on the network.
For access point (infrastructure) connection: Assign the name of the work group to be accessed.
6 Click the [OK] button. If a message is displayed that requests you to restart the personal computer, click [Yes]
to restart the computer.
To modify the computer name and/or the work group name, you need to be logged in from Windows as an
administrator.
To change the name, click [Change] and then proceed in accordance with the instruction messages displayed on
the screen.