


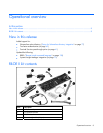
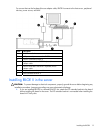
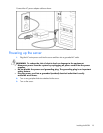


Installing the RILOE II 13
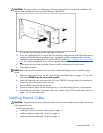
CAUTION: The screws shown are self-tapping, and some amount of force is required for installation. Use
caution when installing the screws to prevent damage to the RILOE II.
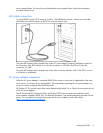
The extender should extend past the right edge of the board.
2. If you are installing RILOE II in a server that was previously configured with a RILOE and the server is
running a Windows®-based operating system, upgrade the systems management driver with the
Advanced System Management Driver found on the HP website (http://www.hp.com/servers/lights-
out). The systems management driver must be upgraded before installing RILOE II in the server.
3. Power down the server and disconnect all power cords to remove power from the server.
4. Disassemble the server.
NOTE: Refer to the server documentation for instructions on disassembling the server to install an option
board.
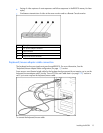
5. Select an appropriate PCI slot. See the "Server PCI Slot and Cable Matrix (on page 174)" for more
information. RILOE II can be server-slot specific.
6. Loosen the retaining screw and remove the slot cover. If RILOE II is being installed in a hot-plug slot,
release the slot lever and remove the slot cover.
7. Press the RILOE II board firmly into the slot.
8. Secure the board in place with the retaining screw, or close the hot-plug slot lever, as appropriate.
9. Disable the onboard video, if required for the server. See the "Server PCI Slot and Cable Matrix (on
page 174)" for more information.
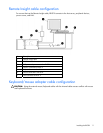
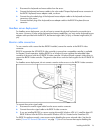
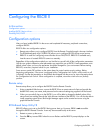
Installing Internal Cables
CAUTION: Using the external mouse/keyboard cables with the internal cables causes conflicts with mouse
and keyboard functions.
The following describes:
• installing a Virtual Power button cable (4-pin) (on page 14)
• installing a Remote Insight cable (16-pin) (on page 14)
• installing a Remote Insight cable (30-pin) (on page 14)