


2. Remove the appropriate I/O module by loosening the 2 straight-
slot screws that connect the back panel of the I/O module to the
chassis and then pulling the module out.
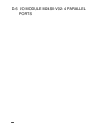
3. If upgrading a serial module, locate socket U3 on the appropriate
I/O module (see
Appendix D.7
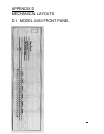
). If upgrading the M24SII-V02
parallel module, locate socket U6 on the module (see
Appendix
D.6
).
4. Remove existing EPROM from the appropriate socket with IC
extractor or needle-nose pliers. Gradually loosen each side of the
chip, alternating pliers from side to side, so as not to bend chip
pins. Pull loosened EPROM all the way out.
5. Install new EPROM into the appropriate socket. The EPROM is
notched; the notch on the EPROM should line up with the notch on
the socket. When installing the new chips, be careful not to bend
any of the pins. Make sure none of the pins miss their sockets.
Also make certain that you install the correct EPROM into the
appropriate I/O module.
6. If more than one I/O module is installed into the Model 24SII,
locate the appropriate socket on those modules and follow the
procedures listed above under steps 2 through 5. Again, refer to
the label on the EPROMs to verify that you are installing the
correct EPROM into the module.
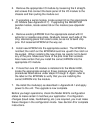
7. Re-install the module(s) as described in
Appendix B.1
and apply
power to the unit. The upgrade is now complete.
Before you begin operations, check the Model 24SII's configuration
status to make certain it matches your application. If configuration
changes (baud rates, handshaking, etc.) are required, you must make
these changes in the configuration mode. See
Section 8
for complete
instructions.